Last updated: May 2026 | Reading time: 12 min | Difficulty: Beginner-friendly
Key Takeaways
- A full car interior deep clean takes 60–90 minutes if you follow the right sequence — most people waste time by starting in the wrong order
- Using the wrong cleaner on the wrong surface (like ammonia on tinted windows, or all-purpose spray on leather) causes permanent damage — this guide tells you exactly what to avoid
- A handheld vacuum with a crevice tool is the single most important tool for this job — more on that below
- You don’t need a $300 detailing kit — 5 basic products cover 90% of what your car needs
- If your car still smells bad after cleaning, you likely missed the three hidden odor zones — we cover those specifically

That Moment You Stop Making Excuses
You know exactly what we’re talking about. You open the car door after a long week, glance at the passenger seat, and there it is — a half-eaten granola bar wrapper, a gym bag that’s been there since March, some mystery crumbs ground into the seat fabric that you genuinely cannot explain.
Maybe you’ve been putting off cleaning it because you don’t know where to start. Or you tried once, used some random spray you found under the sink, and ended up with streaky plastic and a seat that somehow looks worse. Or you just can’t figure out why the car still smells like something died in it even after you threw out all the trash.
Here’s the thing: cleaning a car interior isn’t complicated — but it has a right order, right tools, and a few “never do this” rules that most guides skip right over. If you follow the steps below, your car will look and smell noticeably better within an hour, and you won’t accidentally ruin any surfaces in the process.
We wrote this specifically for people who aren’t professional detailers — just regular drivers who want their car to feel clean without spending $150 at a detailing shop or buying a cabinet full of specialty products.
What You Actually Need (Keep It Simple)
Before you start pulling everything out of your car, gather your tools. Having everything in one spot means you won’t quit halfway through because you had to go hunt for a microfiber cloth.
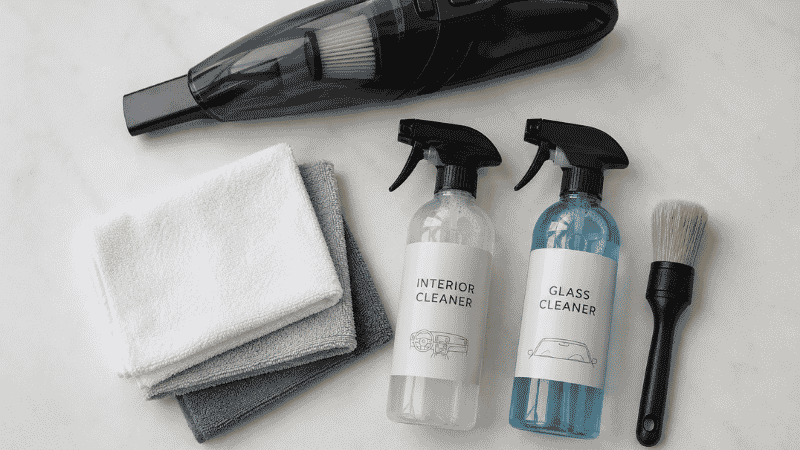
The essential 5:
- Handheld or portable vacuum with a crevice attachment — this is non-negotiable. A full-size household vacuum is awkward and often can’t reach under seats. A decent car vacuum runs $30–$60 and makes this job dramatically easier. (→ See our guide: Best Car Vacuums We Tested)
- Microfiber cloths — at least 3–4 of them. Regular paper towels scratch plastic surfaces and leave streaks on glass. Pick up a pack of 10 for under $15; you’ll use them constantly.
- All-purpose interior cleaner — one bottle handles dashboards, door panels, and the center console. Look for something labeled “safe for vinyl and plastic.” We like Chemical Guys InnerClean or Meguiar’s Quik Interior Detailer — both under $15.
- Ammonia-free glass cleaner — the ammonia in regular Windex can damage tinted windows and some dashboard materials. Stoner Invisible Glass is the go-to for $8 at any auto parts store.
- Upholstery cleaner or fabric spray — specifically for cloth seats and carpets. For leather, you need a separate leather cleaner; we’ll get to that.
Optional but genuinely useful:
- A soft detailing brush (or a clean, old toothbrush) for air vents and seams
- Compressed air can for blasting debris out of tight spots before vacuuming
- Rubber gloves — you’ll thank yourself
The Cleaning Order That Actually Works
This is where most people go wrong. They clean the windows first, then vacuum, and dust falls right back onto the glass. Or they wipe the dashboard and watch grit fall onto the seats they just cleaned.
The rule is simple: always work top to bottom, front to back, dry before wet.
Step 1: Clear Everything Out First (5 minutes)
Remove everything that doesn’t belong in the car. All of it. Open the glove box, the center console, the door pockets, the seatback pockets. Pull the floor mats out and set them aside — you’ll clean those separately.
This step feels obvious, but it changes everything. When the car is empty, you can actually see what you’re dealing with and you won’t have to work around obstacles.
Check under the seats. That’s where the real archaeology happens — old receipts, forgotten sunglasses, loose change, and enough crumbs to feed a small animal. Use a flashlight if you have one.
Step 2: Vacuum the Entire Interior (15 minutes)
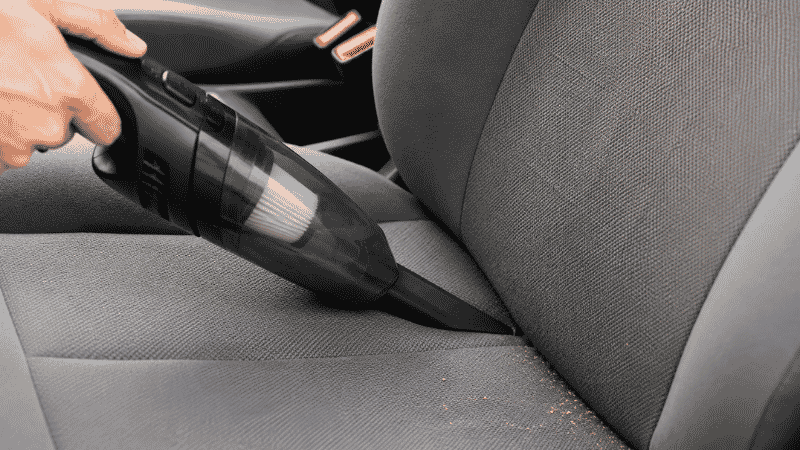
Start at the top — headliner, then seats, then floor. The reason is simple physics: dislodged dust and debris falls down, so you clean the lower areas last.
For the headliner (the fabric ceiling): Use a soft brush attachment, not the bare vacuum nozzle. The fabric is delicate, and aggressive suction or friction can pull it away from the adhesive backing over time. Light, overlapping passes are enough.
For the seats: Push the front seats all the way forward first and vacuum behind and under them — this is the most neglected spot in any car. Then slide them back and do the front. Use the crevice tool to get into the seam where the seat back meets the cushion; that gap collects more debris than anywhere else.
For the floors: Vacuum thoroughly, especially under the pedals. If you have all-weather rubber mats, those go outside for a separate cleaning. If you have fabric mats, vacuum them flat before picking them up, or you’ll scatter debris everywhere.
The vents: Run the crevice tool lightly across each vent. For deeper grime in the slats, a soft brush or cotton swab dipped in dry compressed air works better than trying to vacuum it out.
Step 3: Clean the Hard Surfaces (15 minutes)
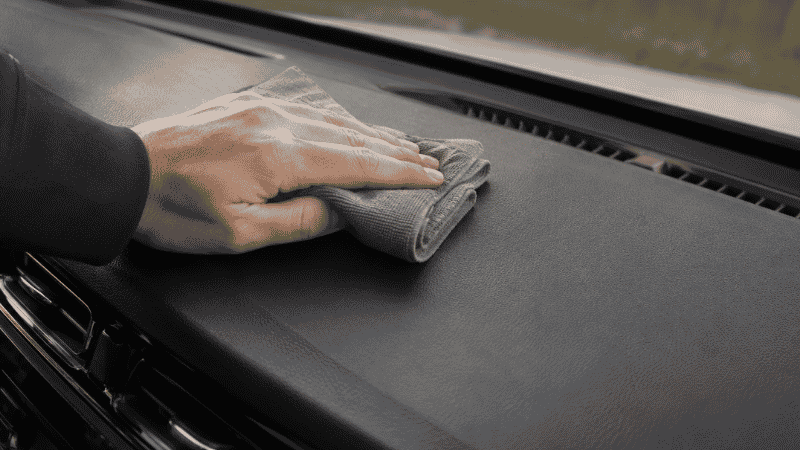
This covers the dashboard, center console, door panels, steering wheel, cupholders, and gear shift area.
Spray your interior cleaner onto a microfiber cloth — not directly onto the surface. Spraying directly risks getting product into electronics, touchscreens, or button gaps you can’t wipe out. Wipe in straight strokes, not circles. Turn the cloth to a clean section as it picks up grime.
Steering wheel: This is the highest-touch surface in the car and typically harbors more bacteria per square inch than a public toilet seat — a finding consistently documented in automotive hygiene studies. Wipe it down thoroughly. If you have a leather-wrapped wheel, use a leather-safe cleaner rather than all-purpose spray.
Touchscreens and infotainment displays: These need a dry or very lightly dampened microfiber cloth only. No cleaning products. No paper towels. Scratching the screen is irreversible.
Cupholders: If yours are removable, pop them out and rinse in the sink — it’s genuinely the easiest way. If they’re fixed, wrap a damp cloth around a pen or butter knife to get into the corners. Dried coffee is basically glue at this point, so let a damp cloth sit in there for 30 seconds before wiping.
⚠️ Never apply interior dressing to the steering wheel, gear shift, or pedals. Protectant sprays make surfaces slippery. On anything you need grip on while driving, this is a safety hazard.
Step 4: Clean the Seats (15–20 minutes)
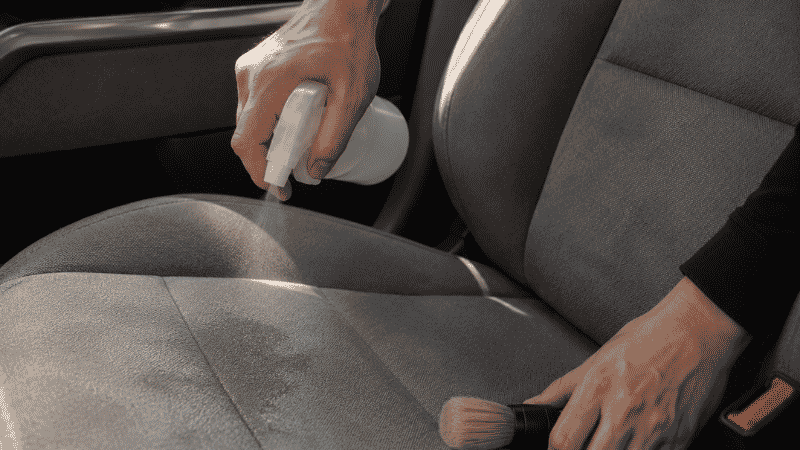
This is where material type matters most. Using the wrong product on the wrong seat type is how people ruin interiors.
Cloth / fabric seats: Spray a dedicated fabric cleaner on the surface and work it in gently with a soft brush or microfiber cloth. Don’t drench the fabric — damp is the goal, not wet. Soaking cloth seats leads to mold and mildew forming underneath, which creates the musty smell that’s almost impossible to fix without professional extraction. Blot the surface with a dry cloth afterward and let the car air out with windows open.
For visible stains: mix two cups of water, one cup of white vinegar, and a tablespoon of dish soap in a spray bottle. Spray on the stain, let it sit for 10–15 minutes, then blot (don’t rub) with a clean cloth. Rubbing pushes the stain deeper into the fibers.
Leather seats: Use a dedicated leather cleaner — not all-purpose spray, not vinegar solutions. Apply to a soft cloth and wipe in straight lines. After cleaning, apply a leather conditioner while the surface is still slightly damp. Conditioner is not optional — leather without conditioning dries out and cracks over time, and once it cracks, there’s no going back without professional repair.
What if the stain won’t budge? For really stubborn stains on fabric — pet accidents, old food spills, ink — try an enzyme-based cleaner like Folex or Bissell Pet Stain & Odor. Enzyme cleaners break down organic matter at a chemical level rather than just masking it. Let it sit for 5 minutes before blotting.
Step 5: Clean the Floor Mats
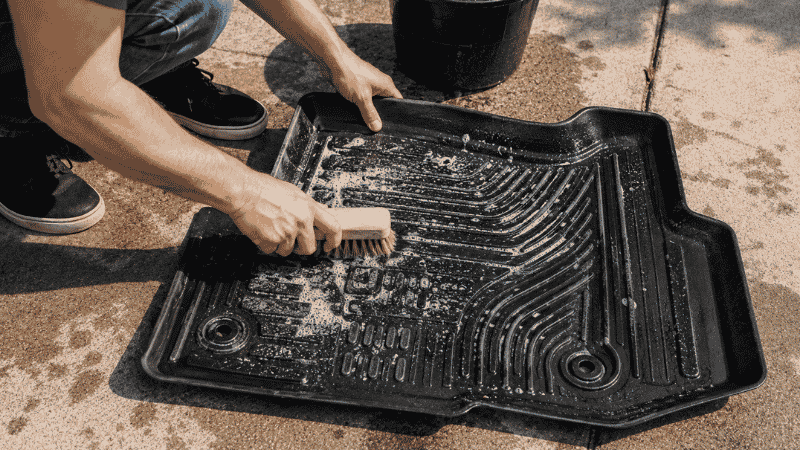
Rubber or all-weather mats: Take them outside. Rinse with a hose, scrub with a brush and dish soap, rinse again, shake off the water, and let them air dry before putting them back. Do not put wet mats back in the car.
Fabric mats: Vacuum thoroughly, then treat the same way as fabric seats. If they’re heavily soiled, a garden hose and stiff brush with upholstery cleaner, followed by a proper dry-out in the sun, is the most effective approach.
Step 6: Clean the Windows and Mirrors (10 minutes)

Save glass for last — other cleaning steps sometimes send overspray or dust onto the glass, so you want a clean-window start.
Roll each window down about an inch before starting so you can clean the very top edge of the glass (the part that disappears into the door frame is always dirtier than you expect).
Spray ammonia-free glass cleaner on your cloth, not the glass. Wipe one direction on the inside, a different direction on the outside — this lets you tell which side any remaining streaks are on. The windshield interior collects a lot of off-gassing residue from dashboard plastics, especially in new cars, which creates that hazy film you can never quite see through at night. Give it an extra pass.
Step 7: Deal with the Smell (If There Is One)
A lot of people skip everything above and go straight for an air freshener. That’s why their car smells like “pine tree and something dead” for the next six months.
You can’t deodorize your way out of an odor source. You have to find it and eliminate it.
The three hidden odor zones most people miss:
- Under the seats — food particles, spilled liquids that seeped under the seat rail. Pull the seats forward and look. Clean this area with your upholstery cleaner.
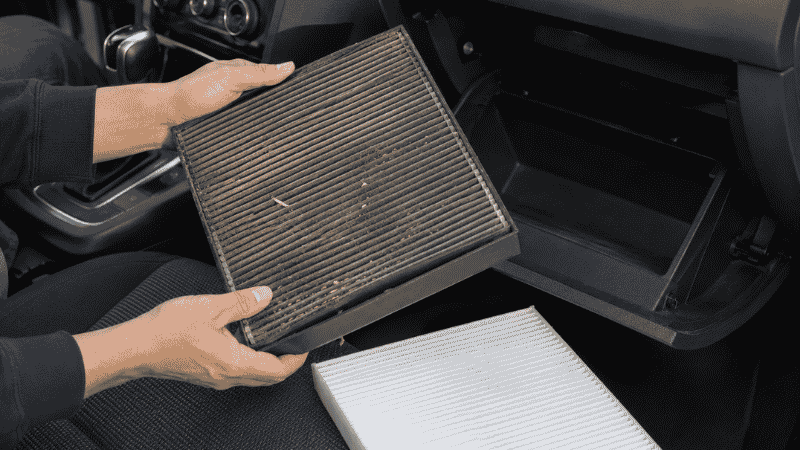
- The air vents and cabin air filter — the filter behind your glovebox traps dust, pollen, and moisture over time and starts to smell. Replacing it takes about 10 minutes and costs $15–25. If your car smells musty when the AC turns on, this is almost certainly why.
- The seat belt webbing — everyone forgets the seat belts. Pull them all the way out and look at them. They absorb body oils, sweat, and food residue and never get cleaned. Wipe with a damp cloth and diluted interior cleaner; let them dry fully before retracting.
If you’ve cleaned everything and there’s still an odor, place an open container of baking soda in the car overnight. For persistent smells (pet urine, mildew, smoke), an ozone treatment from a professional detailer is the only truly effective option — consumer ozone machines exist but require careful use and proper ventilation.
Only Have 10 Minutes? The Quick Reset
Full deep cleans aren’t a weekly event. But if your car needs a quick turnaround before picking someone up or you just want to maintain a clean interior between deep cleans, here’s a focused 10-minute version:
- Grab all trash — everything in pockets, cupholder, and seats. Into a bag, done.
- Quick vacuum — just the seats and visible floor areas, 3 minutes.
- Wipe the dashboard and console — one microfiber pass with interior cleaner.
- Wipe the steering wheel — 30 seconds, always worth it.
- Glass if needed — front windshield only if visibility is affected.
That’s it. It won’t be a detail-shop finish, but it’ll look and feel ten times better than before, and it takes less time than the drive-through.
When You’ve Done Everything and It’s Still Not Right
Still smelling bad? See the hidden odor zones section above, then check your cabin air filter. If the smell is specifically mildew or mold, there may be moisture getting in from a weatherstripping issue or a clogged AC drain — that’s worth having a mechanic look at.
Stain won’t come out? If you’ve tried fabric cleaner and enzyme cleaner and the stain is still there, it may have set permanently — especially if it’s been there a while and was allowed to dry completely. A portable carpet extractor (you can rent one from Home Depot) can sometimes pull out what spray-and-blot cannot.
Leather looks worse after cleaning? You may have used a product that’s too harsh or stripped the finish. Apply leather conditioner immediately. If the finish has cracked or peeled, that requires professional repair — no DIY product fixes actual leather damage.
Plastic surfaces look streaky or greasy? You probably applied too much product. Wipe off with a clean dry cloth and buff gently. Interior dressing should leave a matte finish, not a shine — if it looks wet, you’ve applied too much.
How Often Should You Clean Your Car Interior?
This is genuinely one of the most-searched follow-up questions, and the honest answer is: more often than most people do, less often than you’d think is necessary.
- Weekly: Quick trash removal, steering wheel wipe-down
- Monthly: Vacuum, dashboard and console wipe, window cleaning
- Every 3–6 months: Full deep clean including seats, mats, and odor check
- Annually: Leather conditioning (if applicable), cabin air filter replacement, full deodorize
The interval shifts based on use. If you have kids, pets, or eat in the car regularly, move everything up one level. If you commute solo and the car barely gets used on weekends, you can stretch the deep clean to twice a year without issues.
FAQ
Can I use household cleaners like Windex or 409 inside my car? Windex contains ammonia, which can permanently damage tinted windows and some dashboard materials — avoid it. 409 is too harsh for most interior plastics and leather. Stick to cleaners specifically formulated for automotive interiors; they’re designed to clean without damaging the materials involved.
How do I get pet hair out of car seats? Vacuuming alone rarely works on embedded pet hair. The most effective method: put on a rubber glove, dampen it slightly, and run your hand across the seat in one direction. The hair clumps up and can be grabbed. Alternatively, a squeegee with a rubber blade or a dedicated pet hair removal brush (around $12 on Amazon) does the same thing faster.
Is it safe to use a steam cleaner on car interiors? Yes, for most surfaces — but with care. Steam is excellent for grout lines, vents, and fabric seats. Do not use steam on the headliner (it can loosen the adhesive) or on electronic components. Keep the steam moving; holding it in one spot on fabric or leather can cause damage.
My car smells like mildew after rain. What’s happening? This almost always means moisture is getting into the car somewhere — most commonly a clogged sunroof drain, a worn door seal, or a cracked weatherstripping seal. Find and fix the water source first, then treat the mold. An ozone treatment will kill the mold spores, but if the moisture source isn’t fixed, the smell will return.
Can I use the same cleaner on leather and fabric seats? No. All-purpose interior cleaners are generally too harsh for leather and can dry it out or strip the finish. Fabric cleaners often contain surfactants that can stain leather. Use materials-specific products — the bottles will say clearly what surfaces they’re designed for.
How do I clean car air vents without scratching them? A small, soft detailing brush (or a foam paintbrush from a hardware store) works better than a vacuum or cloth for this. Lightly spray the brush with interior cleaner, then work between the slats. A cotton swab reaches the very back of each vent slot. Never force anything rigid into the vents — the slats break easily.
Does baking soda actually work for car odors? It works as a short-term absorber for mild odors — leave an open box or dish of it in the car overnight. It does not eliminate odor sources; it just absorbs some of the airborne smell temporarily. For anything beyond a faint smell, you need to identify and clean the source.
References
- American Society for Microbiology — Research on surface bacterial contamination in frequently touched spaces (2022)
- EPA Indoor Air Quality Guidelines — Vehicle cabin air quality and filtration standards
- National Highway Traffic Safety Administration (NHTSA) — Driver distraction and vehicle maintenance guidelines
- Bosch Mobility Aftermarket Technical Training Division — Interior material care recommendations
Questions or something we missed? Contact us — we read every message.