Last updated: May 2026 | Reading time: 12 min | Category: Safety & Emergency
Key Takeaways
- A flat tire change takes 15–30 minutes once you know the sequence — the panic is what makes it feel longer
- Loosen the lug nuts before you jack the car up — this is the step most people do in the wrong order, and it makes everything harder
- Donut spare tires have a 50 mph / 50 mile limit — driving faster or farther risks a second emergency
- If you don’t have a spare, you have three real options: tire inflator foam, run-flat tires (if equipped), or roadside assistance — we cover all three
- The one tool most new drivers are missing from their trunk: a portable tire inflator — it solves slow leaks without any of this
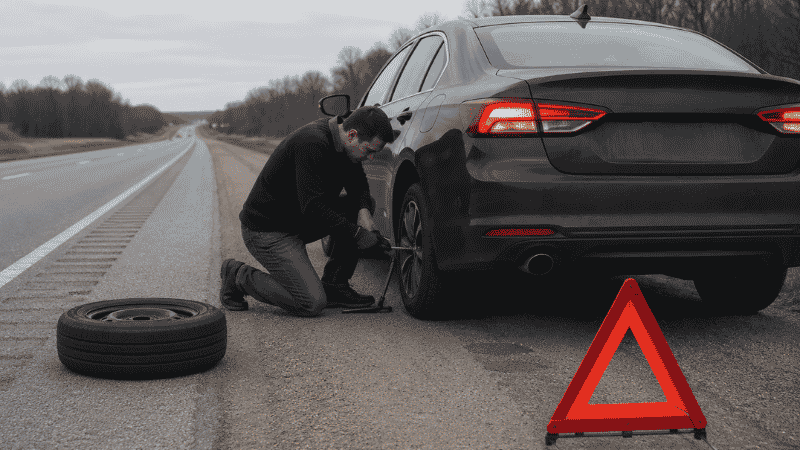
It Happens Faster Than You Expect
You hear a sound you’ve never heard before — a rhythmic thumping, or maybe a sudden loud pop — and the car starts pulling hard to one side. You grip the wheel, ease off the gas, and pull over. Heart rate up. Phone battery at 18%.
This is the moment that separates drivers who’ve thought about this scenario from those who haven’t.
Here’s what matters most in the first 30 seconds: don’t brake hard. If a front tire blows, hard braking can spin the car. Ease off the accelerator gradually, keep the wheel straight, and let the car slow on its own as you steer toward the shoulder. Breathe. You can do this.
Most new drivers have never changed a tire in their lives — and the instructions in the owner’s manual are printed in 8-point font, which you cannot read while sitting on the side of a road at 7 p.m. This guide is written for that exact moment: clear, sequenced, and honest about what’s hard the first time so you’re not surprised by it.
Before You Start: Is It Safe to Change It Here?

This is the most important decision you’ll make, and it comes before any tools come out.
Good locations for a tire change:
- Wide, paved shoulder with space to work
- Parking lot, side street, or rest area
- Flat, firm surface — not grass, gravel, or uneven ground
Bad locations — drive on the flat or call for help:
- Narrow highway shoulder with fast-moving traffic passing close
- Bridges or tunnels
- Active traffic lane or intersection
- Blind curves where approaching drivers can’t see you
A flat tire damages the wheel rim as you drive on it. Driving slowly to a safer location will cost you a rim repair that might run $100–$200. Getting hit by a passing vehicle costs far more than that. If the location isn’t safe, hazard lights on, call roadside assistance, and wait inside the car with your seatbelt on.
If the location is workable, here’s what to do first:
- Pull as far off the road as possible — every extra foot of distance from traffic matters
- Turn on hazard lights immediately — even in daylight
- Apply the parking brake before you get out
- Place reflective triangles or road flares behind the car — at least 50 feet back, more on highways. This step saves lives and most drivers skip it
What You Need — And What’s Probably Missing from Your Trunk
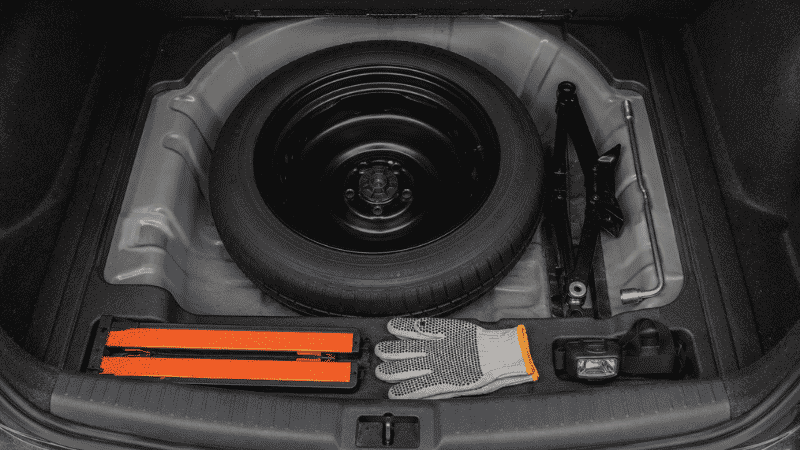
The Basics (Should Already Be in Your Car)
Most vehicles come with these from the factory:
- Spare tire (full-size or donut) — check that it’s properly inflated before you need it. Spare tires lose pressure over time and many drivers discover their spare is flat when they’re already dealing with one flat
- Car jack (scissor or hydraulic floor jack)
- Lug wrench
- Vehicle owner’s manual (has the jack point locations for your specific car)
What Most Drivers Are Missing
- Reflective triangles or road flares — the single most important safety item for roadside work
- Portable tire inflator / air compressor — a slow leak can often be reinflated without a full tire change, buying you time to reach a shop. A compact inflator runs $25–$40 and lives in the trunk. (→ See our guide: Best Portable Tire Inflators)
- Gloves — lug nuts and tires are dirty. Handling them bare-handed in the dark is unpleasant and makes grip harder
- Flashlight or headlamp — your phone flashlight ties up your hands. A headlamp ($15–$25) keeps both hands free
- Wheel wedges — small rubber blocks placed under the non-flat tires to prevent rolling. Optional but add stability
Check your spare tire pressure now — don’t wait until you’re roadside. The recommended pressure for most donut spares is 60 PSI (check your manual). A standard tire gauge or portable inflator will read this.
How to Change a Flat Tire: Step by Step
Step 1: Loosen the Lug Nuts First (Before Jacking)
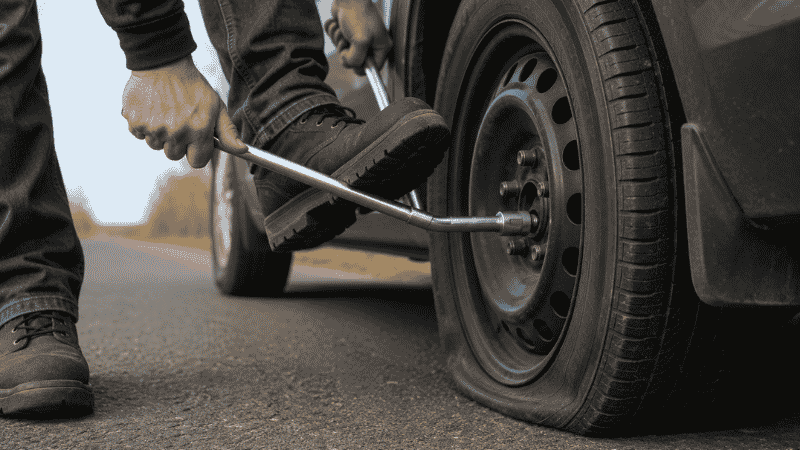
This is the most commonly reversed step. People jack the car up first, then discover they can’t get the lug nuts to turn because there’s nothing to push against — the tire just spins.
With the car still on the ground, use the lug wrench to break the lug nuts loose. Turn counterclockwise. They may be very tight, especially if you’ve never done this before. Use your body weight — place the wrench on the nut and push down with your foot if needed. You’re not removing them yet, just breaking the initial resistance. One full turn each is enough.
If your wheels have a decorative hubcap, you’ll need to remove it first. Use the flat end of the lug wrench or a flathead screwdriver to pry it off. Your owner’s manual shows the correct technique for your specific wheel design.
If you have wheel locks (anti-theft lug nuts with a unique pattern), you’ll need the matching key — usually a small adapter stored in the glove box or with the spare tire kit. If you can’t find it, a locksmith or tire shop can help, but you won’t be able to change the tire without it.
Step 2: Find the Jack Points
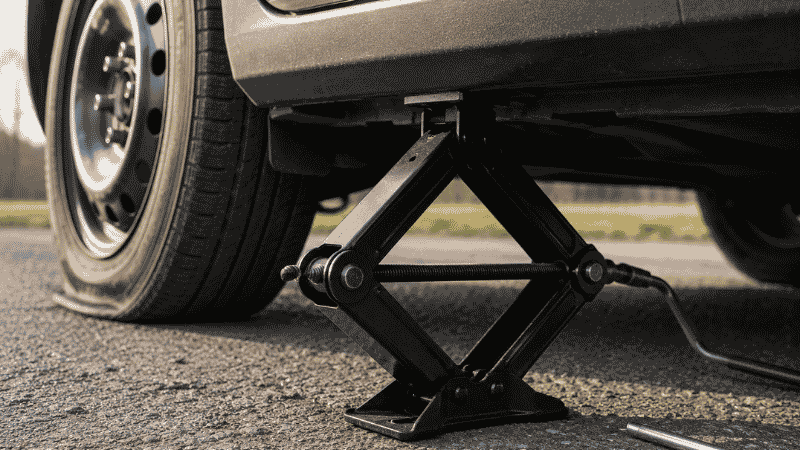
Never place the jack under a random spot on the frame — you can crack the plastic underbody panels or damage the frame itself. Every vehicle has designated jack points: reinforced sections designed to support the car’s weight.
Look for them along the vehicle’s rocker panel (the metal strip running along the bottom between the front and rear wheels). They’re typically marked by a notch, arrow, or small triangle molded into the metal. Your owner’s manual has an illustration showing the exact locations for your specific car.
Once you’ve located the correct jack point nearest to the flat tire, position the jack head directly under it. The jack needs to sit on firm, flat ground — if the ground is soft, place a piece of wood or a flat rock under the jack base to distribute the load.
Step 3: Raise the Car
Slowly crank the jack up until it makes contact with the jack point, then continue raising until the flat tire is about 6 inches off the ground. You need more clearance than you think — the spare tire (which is inflated) is taller than the flat, and it needs room to fit.
Raise the car slowly and pause periodically to check that the jack is stable. If the car rocks or the jack looks like it’s tilting, lower it, reposition, and start again. A falling car causes serious injury. A few extra minutes of setup is worth it.
Never put any part of your body under a car supported only by a scissor jack. If the wheel comes off and you need to see under the car, use a flashlight — not your head.
Step 4: Remove the Lug Nuts and Flat Tire
With the car safely raised, remove the lug nuts the rest of the way. Put them somewhere you won’t lose — in your upturned hubcap, your pocket, or a small container. Losing a lug nut roadside is a genuine problem because you need all of them.
Grab the flat tire with both hands and pull it straight toward you. It may resist briefly — a light back-and-forth wiggle usually frees it. Slide it under the car near the jack as a safety backup. If the jack fails with you standing there, the flat tire under the car creates a gap that prevents the car from dropping all the way to the ground.
Step 5: Mount the Spare Tire
Lift the spare tire (hold it by the tread, not the wheel — metal edges can cut) and align the holes in the wheel with the studs sticking out from the hub. Slide it onto the studs until it’s flush against the hub.
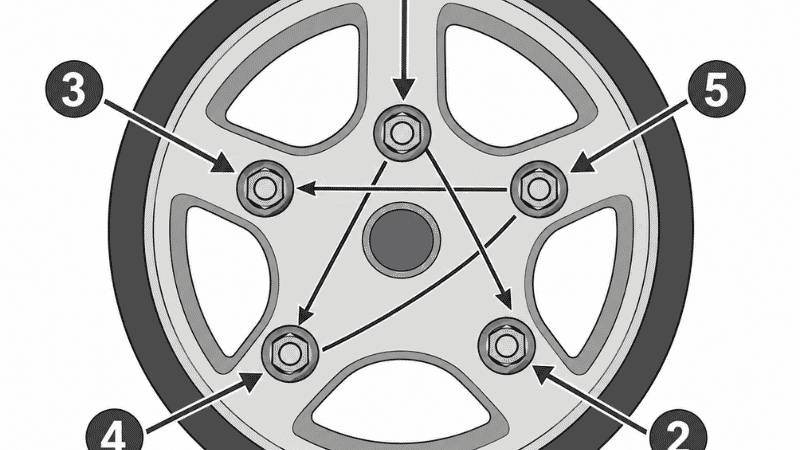
Thread the lug nuts back on by hand in a star or crisscross pattern — not going around the wheel in a circle. The star pattern ensures the wheel seats evenly. Tighten them hand-tight only at this stage.
Do not use the lug wrench to tighten the lug nuts while the car is in the air. The torque from the wrench will spin the wheel rather than tightening the nuts, and may destabilize the jack.
Step 6: Lower the Car and Tighten the Lug Nuts
Lower the jack slowly until the spare tire contacts the ground and takes the car’s weight. Remove the jack from under the car.
Now use the lug wrench to fully tighten the lug nuts in the same star/crisscross pattern. These need to be genuinely tight — use your body weight if needed. A properly tightened lug nut on most passenger vehicles requires 80–100 ft-lbs of torque. Without a torque wrench, “as tight as you can get it with a lug wrench and body weight” is a reasonable approximation, but have a shop confirm the torque when you get there.
Give each nut a final check in the star pattern after you think they’re done. Loose lug nuts are a serious safety hazard.
Step 7: Check the Spare’s Pressure and Pack Up
Before driving, check the spare tire’s pressure if you have a gauge or portable inflator. A donut spare should be at about 60 PSI. If it’s significantly lower, inflate it before driving.
Stow the flat tire, jack, lug wrench, and all your tools. Put the flat tire where the spare was (many spare tire compartments accommodate the flat). Don’t leave tools loose in the trunk — they become projectiles in a sudden stop.
Remove your reflective triangles or road flares before pulling away.
Donut Spare vs Full-Size Spare: What You’re Working With
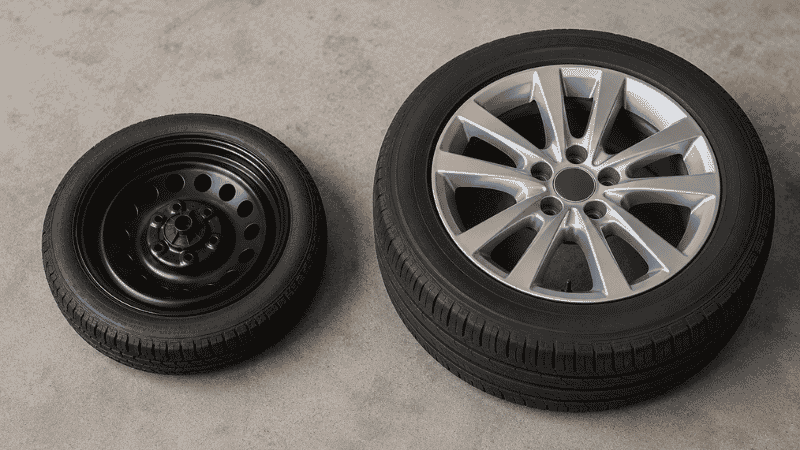
Most small to mid-size cars come with a compact spare (“donut”). They’re smaller, lighter, and save trunk space — but they come with strict limits.
Donut spare limits:
- Maximum speed: 50 mph — the smaller size and different construction can’t handle highway forces
- Maximum distance: 50 miles (some manufacturers say 70, but 50 is the conservative standard)
- Cannot be rotated or used as a permanent tire
- Handling and braking will feel different — especially noticeable in turns
Full-size spare (matching your other tires): No special speed or distance limits, though you should still get your flat repaired promptly since you’re back to zero backup.
Full-size non-matching spare (same size but different brand/tread): Technically no limits, but avoid mixing significantly if you have AWD — tread depth differences can stress the drivetrain.
Get to a tire shop as soon as practical after mounting a donut. Don’t let “I’ll deal with it later” turn into three weeks of 50 mph highway driving.
What If You Don’t Have a Spare?
More vehicles are shipping without spare tires than ever before — run-flat tires, tire pressure monitoring systems, and trunk space considerations have pushed spare tires out of many newer vehicles. If you discover mid-crisis that you have no spare, here are your actual options:
Option 1: Tire Inflator + Sealant (Works for Slow Leaks, Not Blowouts)
A can of tire sealant foam (Fix-a-Flat, Slime, etc.) can temporarily seal small punctures — nail, screw, or similar. Attach it to the valve stem, inject, then inflate with a portable compressor. This works for simple tread punctures. It does not work for sidewall damage, large holes, or blowouts.
Important: sealant foam coats the inside of the tire and can complicate professional repair afterward. Tell the tire shop you used it. Some shops charge extra to clean it out.
Option 2: Run-Flat Tires (If Your Car Came With Them)
Run-flat tires have reinforced sidewalls that support the car’s weight even with no air pressure. If your car was equipped with run-flats from the factory, you can typically drive up to 50 miles at 50 mph after a puncture. Your TPMS (tire pressure monitoring system) will alert you when pressure drops.
Do not attempt to drive run-flats beyond their rated range — the sidewall will eventually fail. And run-flat tires cannot be repaired after a blowout; they need replacement.
Option 3: Roadside Assistance
If you have AAA membership, your auto insurance’s roadside coverage, or a manufacturer’s roadside program (most new cars include it for the first few years), call them. A tow truck can bring you to a tire shop. This is the right call when the location is unsafe, you don’t have a spare, or you’re not comfortable doing the change yourself.
Keep the roadside assistance number in your phone contacts — not just in the glove box — because you need it when you’re stressed.
Special Situations: Night, Rain, and Highway Shoulders
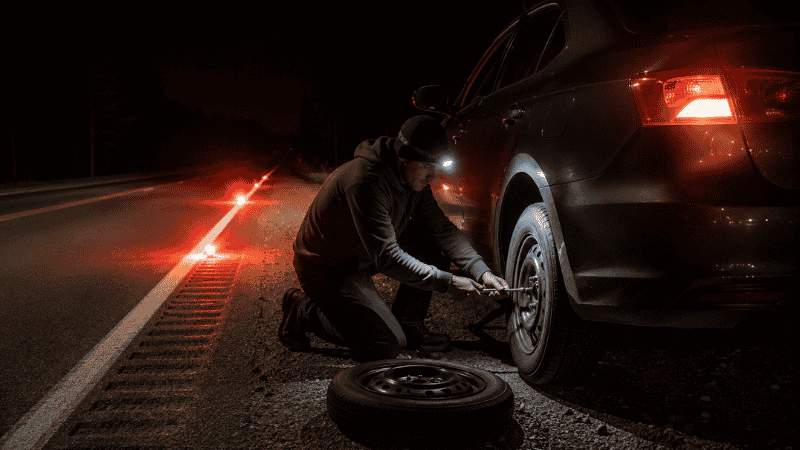
Changing a Tire at Night
Use your hazard lights, your headlamp (both hands stay free), and set reflective triangles or flares farther back than you would in daylight — 100 feet minimum on a highway. Wear light-colored or reflective clothing if you have it. Park as far off the road as physically possible. If you have any doubt about visibility or safety, stay in the car and call roadside assistance.
Changing a Tire in Rain
Rain makes the ground slippery, which makes jacking up the car less stable. If you must change it in the rain, position the jack on the firmest section of ground you can find. Keep the jack vertical — any tilt on wet ground increases the risk of it slipping. Work quickly but don’t rush the steps that matter: jack stability, lug nut torque. If the location is unsafe in wet conditions, call for help.
Highway Shoulders
This is the highest-risk scenario. Even with hazard lights and reflective triangles, highway shoulder tire changes have resulted in serious accidents. If your shoulder is narrow, if traffic is moving at speed close to you, or if visibility is poor — get in the car, stay buckled, and call roadside assistance. The wheel rim is replaceable. You are not.
After the Change: What Comes Next
Once you’re rolling on the spare, three things need to happen:
1. Get the flat inspected and repaired or replaced. Many punctures — especially nail or screw holes in the tread — can be professionally patched for $15–$30. A patch on the sidewall is generally not safe and requires full replacement.
2. Have lug nut torque checked. A shop can verify proper torque in minutes with a torque wrench. This takes 5 minutes and costs nothing at most tire shops.
3. Replace or reinstall your spare. If you used the donut, keep it as your backup. If you used a full-size spare, get your original tire repaired and put back in its place.
When to Stop and Call for Help Instead of Changing It Yourself
- The location is unsafe: narrow shoulder, highway with no visibility, bridge, tunnel
- You’re changing a tire at night on a major road and don’t have reflective gear
- Your jack is missing, broken, or you can’t locate the jack points
- The spare tire is flat, severely damaged, or missing
- You have a blowout rather than a slow leak (sidewall damage — not repairable)
- You feel physically unable to safely complete the job
Calling for help is not a failure. It’s the correct decision when the risk of the DIY outweighs the benefit.
FAQ
How long does it take to change a flat tire? For someone who knows the steps, 15–25 minutes. For a first-timer doing it carefully, plan for 30–45 minutes. The first time always takes longer — you’re learning the sequence while doing it. Practicing once in your driveway before you ever need to do it roadside cuts that time in half.
Can I drive on a flat tire to get to a gas station? A few hundred yards to a safer stopping point, yes. More than that causes rapid and severe rim damage. Rim replacement costs $100–$300 or more — far more than a tire repair. If the location is genuinely unsafe and you must move, go slowly and briefly. Otherwise, don’t drive on it.
What tools do I need to change a flat tire? At minimum: a spare tire, car jack, lug wrench, and your owner’s manual (for jack point locations). Strongly recommended additions: reflective triangles, gloves, a flashlight or headlamp, and a portable tire inflator for slow leaks.
How do I know if my spare tire is still good? Check it monthly — seriously. Spare tires lose air pressure over time and are frequently discovered to be flat when you need them most. Also check the manufacture date on the sidewall: spare tires older than 6–10 years may have compromised internal structure even if they look fine and hold pressure.
What’s the difference between a flat tire and a blowout? A flat is a gradual or sudden loss of air pressure. A blowout is a sudden, explosive failure — often with a loud bang and immediate loss of control. Flats can often be repaired; blowouts typically require full tire replacement. Both are handled the same way in the first seconds: don’t brake hard, steer straight, ease off the accelerator.
How much does it cost to fix a flat tire? A simple tread puncture repair (nail, screw, similar) runs $15–$30 at most tire shops. Sidewall damage isn’t repairable — it requires full tire replacement, which varies significantly by tire type and vehicle. A new standard passenger car tire runs $80–$200 installed.
Should I practice changing a tire before I need to do it? Yes, absolutely. Find a Saturday morning, pull out your spare and tools, and go through the process in your driveway. You’ll discover any missing tools, learn your car’s jack points, and find out if your spare is properly inflated — all before it becomes an emergency. It takes about 30 minutes and is one of the most practical things a new driver can do.
What’s Next
A flat tire is something you can handle — but the best version of this story starts before the flat happens:
- Car essentials every driver should have — including the portable tire inflator, emergency triangles, and flashlight that make roadside situations manageable. (→ Car Essentials Every Driver Actually Needs)
- How long do car brakes last — tires and brakes are your primary safety systems; knowing both keeps you ahead of problems instead of reacting to them. (→ How Long Do Car Brakes Last)
- How often to rotate tires — regular rotation extends tire life and reduces the chance of uneven wear that leads to unexpected failures. (→ How Often to Rotate Tires)
The drivers who handle roadside emergencies calmly aren’t lucky. They’re prepared.
References
- National Highway Traffic Safety Administration (NHTSA) — Tire Safety: Everything Rides on It, Federal consumer safety publication
- NHTSA — Traffic Safety Facts: Roadside Hazards and Work Zone Safety (2023)
- U.S. Tire Manufacturers Association (USTMA) — Spare Tire Safety and Compact Spare Usage Guidelines
- Federal Highway Administration (FHWA) — Manual on Uniform Traffic Control Devices: Temporary Traffic Control, roadside emergency procedures
Have a roadside emergency question we didn’t cover? Contact us — we read every message.