Last updated: May 2026 | Reading time: 13 min | Category: Safety & Emergency
Key Takeaways
- A DIY oil change costs $25–$60 in materials — but requires $100–200 in tools if you don’t own them yet, which changes the math significantly for first-timers
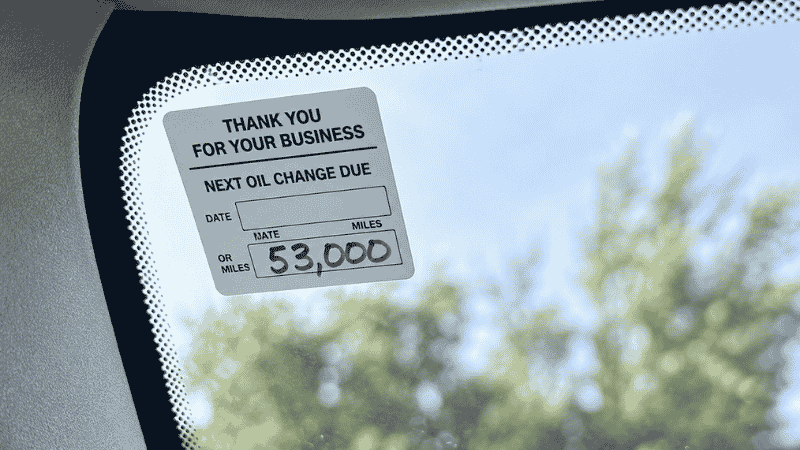
- The “every 3,000 miles” rule is outdated — most modern engines with synthetic oil run 7,500–10,000 miles between changes; check your owner’s manual, not the sticker the shop puts on your windshield
- The drain plug and oil filter are the two places most DIYers make mistakes — overtightening either one creates a repair that costs more than a shop oil change
- Going to a quick-lube shop is genuinely fine — but knowing which add-ons to refuse saves you $30–80 per visit
- Used engine oil is classified as hazardous waste — never pour it down a drain or into the ground; every AutoZone, O’Reilly, and Advance Auto Parts accepts it for free
The $80 Oil Change That Should Have Cost $40
You pulled into Jiffy Lube for a routine oil change. Twenty minutes later, the tech comes back with a list. Cabin air filter — your car needs one, they say. Fuel system cleaner. Transmission fluid flush. Wiper blades. By the time you’ve agreed to a few things that sounded reasonable, you’ve spent $180 on what should have been a $40 service.
This happens to new car owners more than almost any other maintenance scenario. Not because quick-lube shops are inherently dishonest — most are fine — but because they’re running a business model that makes money on add-ons, and you don’t yet know which ones are legitimate and which are unnecessary upsells for your specific car at this mileage.
Learning how to do an oil change yourself is one option. Knowing exactly what a shop is and isn’t worth your money is the other. This guide covers both — starting with the decision that most oil change guides skip entirely.
First: Should You DIY or Go to a Shop?
Before buying a drain pan and crawling under your car, be honest about what makes sense for your situation.
The Real Math of a DIY Oil Change
Materials cost (what you’ll pay every time):
- 5 quarts of synthetic oil: $25–45 depending on brand and viscosity
- New oil filter: $5–15
- New drain plug washer (recommended): $1–3
- Total per change: $31–63
Tool cost (one-time investment, if you don’t own these):
- Floor jack or car ramps: $30–80
- Jack stands (2): $25–40
- Socket wrench set with correct size for your drain plug: $25–50
- Oil filter wrench: $10–20
- Oil drain pan: $10–15
- Funnel: $3–5
- Nitrile gloves, rags: $5–10
- Total tool investment: $108–220
What a shop charges: $40–90 for a basic synthetic oil change at most quick-lube locations. Dealers typically charge $80–130.
The honest conclusion: If you don’t own tools, your first DIY oil change costs $139–283 total — more than 2-3 shop visits. The break-even point is typically 2-4 oil changes after the initial tool investment. If you plan to do your own maintenance for years, DIY makes economic sense. If you’d rather spend 20 minutes at a shop twice a year, that’s also completely reasonable.
DIY Makes Sense If:
- You already own a basic socket set and jack
- You enjoy working on your car and want to learn
- You do multiple oil changes per year (truck, high mileage driving)
- You want to use a specific oil brand that shops don’t stock
Going to a Shop Makes Sense If:
- You don’t have the tools or storage space for them
- You live in an apartment without a safe place to do it
- You’d rather pay for someone else’s time and expertise
- You go less than once every 6 months
There’s no wrong answer. The important thing is making the decision consciously rather than defaulting to one option because you didn’t know the other was viable.
How Often Do You Actually Need to Change Your Oil?
This is the most consequential piece of information in this entire guide, because getting it wrong costs real money.
The short version: read your owner’s manual, not the sticker.
Most quick-lube shops apply a sticker to your windshield recommending your next oil change at 3,000 miles. This interval was accurate for conventional oil in engines built before the mid-2000s. It is not accurate for most modern vehicles.
According to the American Petroleum Institute (API) and vehicle manufacturer specifications:
- Conventional oil in older engines: 3,000–5,000 miles
- Synthetic blend oil: 5,000–7,500 miles
- Full synthetic oil in modern engines: 7,500–10,000 miles (some manufacturers specify 15,000 miles)
If your car’s manufacturer specifies 7,500 miles and you’re changing at 3,000 because of the windshield sticker, you’re paying for two oil changes for every one your car actually needs. On a 15,000-mile-per-year driving schedule, that’s 3 extra unnecessary oil changes per year — $120–270 in wasted money.
The EPA’s oil change guidance reinforces this: follow manufacturer intervals, not aftermarket service recommendations, unless you’re using oil of lower quality than specified.
The “severe service” exception: If you regularly do short trips under 5 miles (common in urban commuting), tow heavy loads frequently, or drive in extreme dust conditions, use the shorter interval. Short trips don’t allow the engine to fully warm up, which means more moisture and contaminant accumulation in the oil. Check your owner’s manual for the “severe service” interval alongside the normal one.
What Oil Does Your Car Actually Need?
This matters more than most new drivers realize. Using the wrong viscosity or specification can reduce engine protection or even void certain warranty claims.
Reading the Viscosity Code
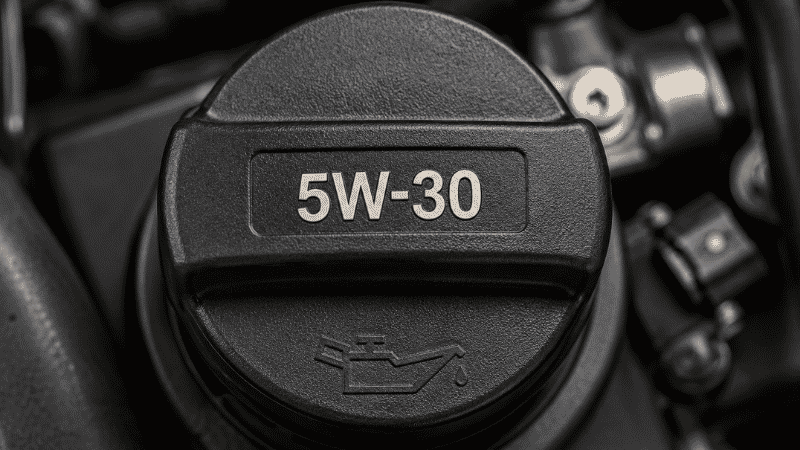
Oil is labeled with a code like 5W-30 or 0W-20. Here’s what it means:
- The first number (5W or 0W) is the “winter” viscosity — how easily the oil flows when cold. Lower is better for cold starts
- The second number (30 or 20) is the operating temperature viscosity — how well it maintains thickness when hot
Where to find your specification: The oil filler cap on your engine usually shows the recommended viscosity. Your owner’s manual has the complete specification. The inside of your driver’s door jamb sticker may also list it.
Never substitute — using 5W-20 in an engine specifying 0W-20 isn’t catastrophic, but it affects cold start protection. Using 10W-40 in an engine specifying 5W-30 can reduce fuel economy and cause slightly more wear.
Synthetic vs. Conventional vs. Synthetic Blend
Conventional oil: Refined from crude oil. Adequate for older engines and shorter change intervals. Cheapest per quart.
Synthetic blend: A mix of conventional and synthetic base oil. Better cold-weather performance and slightly longer interval capability than conventional. Mid-price.
Full synthetic: Engineered from base chemicals rather than refined crude. Best performance, longest change intervals, most consistent molecular structure. Most expensive per quart — but when you factor in fewer changes per year, often cheaper overall.
The practical recommendation: If your owner’s manual specifies full synthetic (most cars built after 2010 do), use full synthetic. Don’t use conventional to save $5 per quart — you’ll change oil more often and get less protection.
How to Do an Oil Change: Step by Step
If you’ve decided to DIY, here’s the complete process. Read through all of it before starting — understanding what you’re about to do makes each step faster and safer.
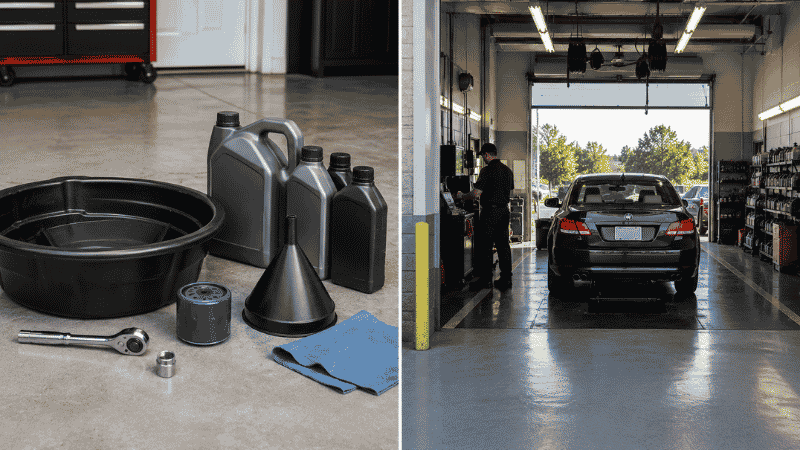
What you need:
- Correct oil type and quantity (owner’s manual)
- New oil filter for your vehicle year/make/model
- Floor jack or car ramps
- Jack stands (if using floor jack)
- Socket wrench with correct drain plug socket size
- Oil filter wrench (likely needed)
- Oil drain pan (minimum 6-quart capacity)
- Funnel
- Nitrile gloves
- Clean rags
- New drain plug washer (check if your car requires one)
Step 1: Warm the Oil Slightly, Then Let It Cool
Run the engine for 3–5 minutes if the car has been sitting cold — warm oil drains faster and more completely than cold oil. Then wait 20–30 minutes. Hot oil causes burns. You want warm, not hot.
Step 2: Safely Raise the Car
If using ramps: Drive onto them slowly. Set the parking brake. Place wheel chocks behind the rear wheels. Never use ramps on an incline.
If using a floor jack: Locate your vehicle’s jack points (in the owner’s manual or marked by notches in the rocker panel). Jack the front of the car, then set jack stands at the designated support points. Lower the car onto the stands before getting under it.
Non-negotiable safety rule: Never work under a car supported only by a floor jack. Jacks fail. Jack stands do not. This is how people die doing oil changes.
Step 3: Position the Drain Pan and Remove the Drain Plug
Locate the oil drain plug on the bottom of the oil pan — a single bolt, usually 14-17mm, at the lowest point of the engine’s oil pan. Position your drain pan beneath it, slightly offset toward the back of the car — the oil streams out at an angle when the plug is first removed.
Using the correct socket size, turn the plug counterclockwise to loosen it. Once loose, switch to hand-tightening counterclockwise — keep fingers on the plug as you unthread it. When it releases, pull it away quickly and sideways to avoid getting your hand in the oil stream.
Let the oil drain fully — typically 3–5 minutes. Replace the drain plug washer if your car uses a crush washer (one-time use) rather than a reusable O-ring style.
The most common mistake here: Overtightening the drain plug on reinstallation. Snug plus a quarter turn is the correct torque for most plugs. Overtightening strips the threads in the oil pan — a repair that can cost $200–500.
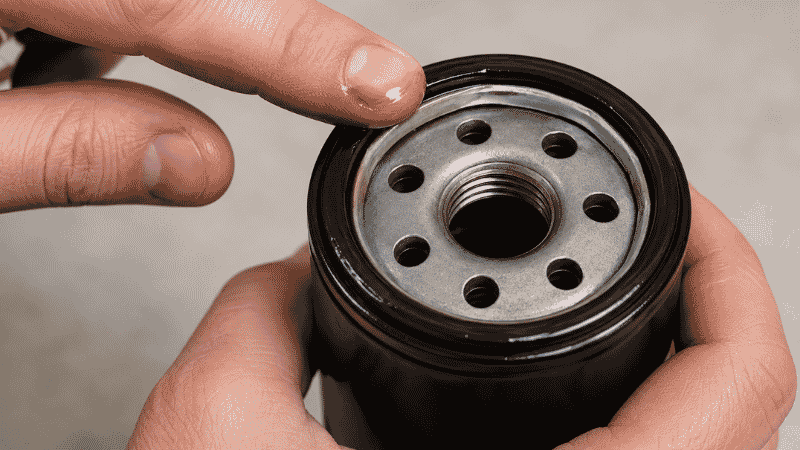
Step 4: Remove and Replace the Oil Filter
While the oil drains, locate the oil filter. It’s either a screw-on canister (round metal cylinder) or a cartridge in a housing, depending on your engine.
For screw-on filters: Turn counterclockwise with a filter wrench or by hand. Have a rag ready — residual oil in the filter will spill when it’s removed. Check that the old rubber gasket came off with the filter — if it stayed on the engine, peel it off before installing the new filter. Installing a new filter over an old gasket creates a double-seal that will leak.
Before installing the new filter: Dip a finger in fresh oil and run it around the new filter’s rubber gasket. This lubricates the seal for proper installation.
For screw-on filters: Hand-tighten until snug, then a further half-turn. No filter wrench for installation — overtightening damages the gasket.
Step 5: Reinstall the Drain Plug
Thread it back in by hand first — if it doesn’t thread easily, stop and re-align. Cross-threading the drain plug is a significant repair. Once hand-tight, use the socket wrench to snug it firmly — about 25 foot-pounds of torque for most plugs, which feels like firmly tight. Don’t crank it.
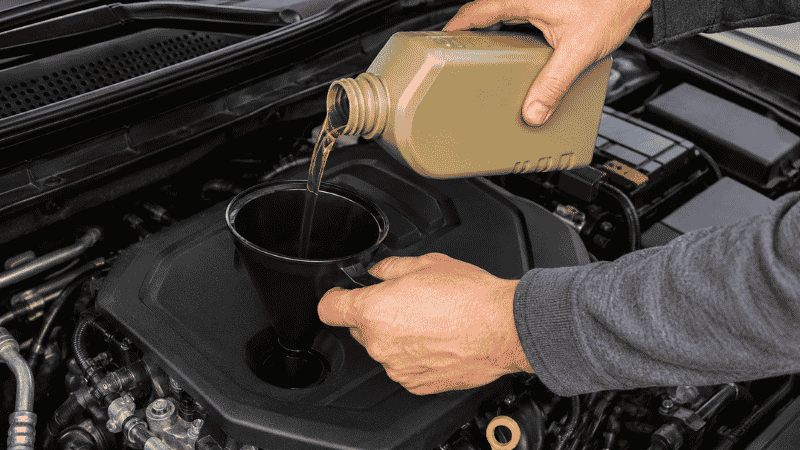
Step 6: Lower the Car and Add New Oil
Lower the vehicle off jack stands. Remove all tools from under the car before lowering.
Find the oil filler cap on top of the engine (marked with an oil can symbol). Remove it. Insert the funnel. Add the correct amount of oil — typically 4–6 quarts for most passenger cars, but check your owner’s manual for the exact quantity.
Pour it in slowly. Most quart bottles take about 30 seconds to drain completely.
Step 7: Check, Start, Check Again
Replace the oil filler cap and make sure it’s fully seated. Pull the dipstick, wipe it, reinsert, pull again — verify the oil level is between the MIN and MAX marks.
Start the engine. Watch the oil pressure warning light — it should go out within a few seconds as oil pressure builds. Let it run for 30–60 seconds.
While it’s running: look under the car (or have someone else look) for any drips from the drain plug or filter area. A slow drip means something isn’t seated correctly.
Shut off the engine. Wait 5 minutes for the oil to settle back into the pan. Check the dipstick again — you may need to add a small amount, as the filter absorbs roughly a third of a quart when oil first circulates through it.
Step 8: Dispose of the Used Oil Properly
Used motor oil is classified as hazardous waste by the EPA. It cannot go in the trash or down a drain — it contaminates groundwater and soil.
Pour the used oil from your drain pan into the empty oil bottles or any sealable container. Every major auto parts store — AutoZone, O’Reilly, Advance Auto Parts, NAPA — accepts used oil for free recycling. Most gas stations with service bays do as well. You can also find local recycling locations at earth911.com.
The used filter goes in a plastic bag sealed closed.

If You’re Going to a Shop Instead: What to Accept and What to Refuse
This section pays for the time you spent reading this entire guide.
What’s included in a standard oil change and should cost nothing extra:
- Oil and filter replacement
- Checking tire pressure (most shops do this automatically)
- Basic visual inspection
Add-ons that may be legitimate — but verify first:
- Cabin air filter: Check the one in your car first (behind the glovebox — see your manual). If it’s visibly dirty and gray, it needs replacing. If it looks clean, you don’t. Cost at a shop: $20–40. Cost at an auto parts store: $15–25 installed yourself in 5 minutes.
- Wiper blades: Look at them yourself before going in. If they streak or skip, they need replacement. If they work fine, they don’t.
- Tire rotation: This is legitimate maintenance every 5,000–7,500 miles and a reasonable thing to do at oil change time. Often discounted when bundled.
Add-ons to refuse unless you’ve researched your specific car’s need:
- Fuel system cleaner/injection cleaning: Rarely necessary on well-maintained modern engines. If you use good fuel and change your oil regularly, this is almost always an upsell.
- Transmission fluid flush: Legitimate maintenance — but typically at 30,000–60,000 mile intervals, not at every oil change. Check your owner’s manual.
- Power steering fluid flush: Even less commonly needed. Most power steering systems don’t require regular fluid replacement.
- Engine air filter: Like the cabin filter, check it yourself first. It’s under the hood in a black plastic box. Visibly gray and dirty = replace. Clean = don’t.
- “BG” or brand-specific additive treatments: Most of these are markup items with limited demonstrated benefit for maintained vehicles.
The technique that saves money: Before any shop visit, spend 5 minutes looking at your cabin air filter and engine air filter yourself. If they’re clean, you can confidently say “no” to filter replacements. If they’re dirty, you can buy them yourself at half the shop price and ask the shop to install them while they have the car (most will for free or minimal labor).
When Something Goes Wrong
Oil light stays on after starting: Shut off the engine immediately. Either the oil pressure is genuinely low (check level immediately), or the sensor needs resetting. Don’t drive with the oil light on.
Drip from the drain plug area: The plug may be undertightened, or the washer wasn’t replaced when it should have been. Wipe dry, run the engine briefly, and check again. If it continues, tighten the plug a small additional amount.
Drip from the filter: The filter is either undertightened or the gasket didn’t seat properly (possibly double-sealed). Wipe dry, tighten hand-tight plus a half-turn, and recheck.
Oil level over the MAX mark on the dipstick: You’ve overfilled. Overfilling causes oil foaming which reduces lubrication. Use a turkey baster or manual oil extractor ($15–20 at auto parts stores) to remove the excess. Don’t drive significantly with overfilled oil.
Stripped drain plug threads: Stop. This is beyond DIY territory. A mechanic can install a Helicoil insert to repair stripped threads, or replace the oil pan. Driving with a loose drain plug is not an option.
FAQ
How long does a DIY oil change take? The first time: 45–90 minutes including setup, learning where everything is, and cleanup. By your third change: 20–35 minutes. It gets dramatically faster once you know your car’s layout and have a system down.
Can I switch from conventional to synthetic oil? Yes, at any time. The old myth that switching to synthetic on an older engine causes leaks has been disproven by major oil manufacturers including Castrol and Mobil. Synthetic oil is compatible with conventional — you can even mix them if needed.
What happens if I don’t change my oil? Oil degrades over time and mileage. Additives break down, contaminants accumulate, and the oil’s ability to lubricate and carry heat diminishes. Extended neglect leads to sludge formation in the engine — a thick, tar-like deposit that blocks oil passages and causes accelerated wear. Severe sludge can require an engine flush or, in extreme cases, engine replacement.
Is it okay to change oil more frequently than recommended? Yes, but unnecessary. More frequent changes don’t provide additional protection beyond the manufacturer’s recommended interval — you’re just spending money and generating more waste oil. Follow the manufacturer’s interval with the oil type they specify.
Can I change just the oil without changing the filter? Technically yes, but not recommended. The old filter contains contaminants from the previous oil cycle that will mix with your new oil immediately. Filters cost $5–15 and take 2 minutes to swap — always change them together.
What if my car has an oil change monitoring system that says the oil is still “life remaining”? Trust it over the mileage interval. Modern oil life monitoring systems (like General Motors’ Oil Life System) measure actual engine conditions — temperature cycles, cold starts, load — not just mileage. If your car says 40% oil life remaining at 5,000 miles, you have more miles to go. These systems are engineered to be conservative.
What’s Next
An oil change is the foundation of engine maintenance. These guides cover the next most impactful habits:
- How to check car fluids — oil is one of six fluids your car needs monitored; understanding all of them takes an extra 5 minutes per month. (→ How to Check Car Fluids)
- How long do car brakes last — the second most common maintenance concern after oil, and the most safety-critical. (→ How Long Do Car Brakes Last)
- Car essentials every driver should have — including the funnel, dipstick cloth, and drain pan that make fluid maintenance clean and simple. (→ Car Essentials Every Driver Actually Needs)
Knowing how to do an oil change — or knowing exactly what to look for when someone else does it — is the difference between being a car owner and being taken advantage of by one.
References
- American Petroleum Institute (API) — Engine Oil Licensing and Certification System, oil specification standards and viscosity grade definitions
- U.S. Environmental Protection Agency (EPA) — Used Oil Management Standards, 40 CFR Part 279; hazardous waste classification and disposal requirements for used motor oil
- Society of Automotive Engineers (SAE) International — Engine Oil Viscosity Classification, SAE J300 (current edition)
- National Institute for Automotive Service Excellence (ASE) — Oil Change Interval Guidance for Consumer Vehicles, technical service bulletin references
Have an oil change question we didn’t cover? Contact us — we read every message.