Key Takeaways
- Always check oil with the engine off and the car parked on level ground — checking on a slope or with the engine warm gives a falsely high reading
- The wipe-reinsert-read sequence is not optional — pulling the dipstick and reading it directly gives an inaccurate measurement every time
- Oil color tells you as much as oil level: amber = healthy, dark brown = due for change, milky/gray = stop driving immediately
- If you’re consistently adding oil between changes, your engine is either leaking or consuming it — both warrant investigation, not just repeated top-ups
- Many vehicles made after 2010 have no oil dipstick — check your owner’s manual before looking for one that isn’t there
The Check That Takes Two Minutes and Prevents Thousands in Repairs
Engine oil is the single most protective thing your car has. It lubricates hundreds of metal-on-metal contact points inside the engine, carries away heat and contaminants, and keeps microscopic particles from scoring the cylinder walls and crankshaft bearings. When oil level drops too low, those metal surfaces start grinding. Within minutes — not hours — of running an engine with critically low oil, the damage is permanent.
The oil dipstick check is how you catch a slow leak or abnormal consumption before it reaches that point. It takes two minutes. It requires one paper towel. And it’s one of those skills that, once you know it, you’ll never understand why you didn’t do it every month.
Here’s how to do it correctly — including the part most guides skip, which is what to do when the reading doesn’t look right.
Before You Start: Two Non-Negotiable Conditions
Get both of these right before touching the dipstick. Getting them wrong makes the reading meaningless.
Condition 1: Engine off, cooled down
Wait at least 5–10 minutes after turning off the engine before checking oil. Running engines circulate oil throughout the entire engine block — into the cylinders, through the oil passages, into the valvetrain. When you shut the engine off, that oil gradually drains back down into the oil pan at the bottom of the engine. If you check immediately after driving, a significant portion of your oil hasn’t settled back yet, and your reading will be lower than the true level.
First thing in the morning before starting the car is the ideal time — the oil has fully settled overnight.
Condition 2: Level ground
Park on a flat surface. Oil in the oil pan shifts with the slope of the car — park on an incline and the oil pools toward the lower end, giving you a falsely low reading on one side and falsely high on the other. If your driveway slopes, pull onto a flat section of street or find level pavement before checking.
How to Check Oil in Your Car: Step by Step
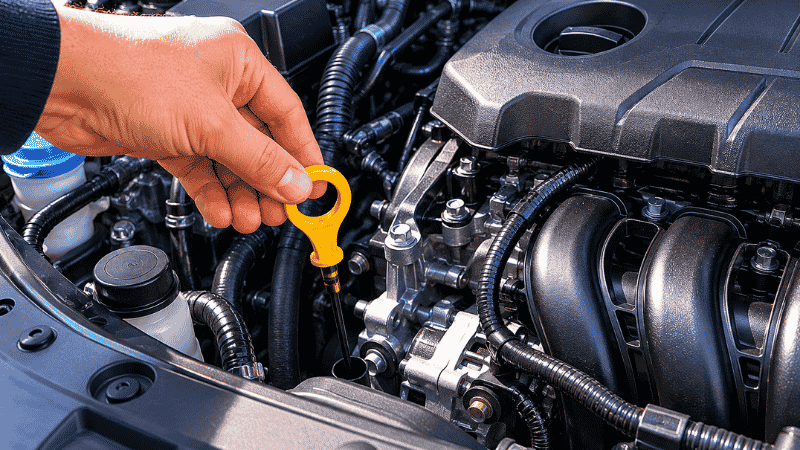
Step 1: Open the Hood and Locate the Dipstick
Pull the hood release lever inside the car — usually found under the left side of the dashboard near the driver’s door. You’ll hear a click and the hood will pop open slightly. Move to the front of the car, press the secondary hood latch (a lever under the center of the hood edge), and lift the hood. Set the prop rod in the hood prop hole to hold it open.
Now find the dipstick. On most vehicles it’s a brightly colored handle — typically yellow, orange, or red — with a loop or ring at the top, sticking up from the engine block. It’s often labeled with an oil can symbol. The location varies by vehicle (driver’s side or passenger’s side, front or rear of the engine bay), but the bright handle color is designed to make it findable quickly.
Can’t find it? Check your owner’s manual — it has a diagram of your specific engine bay. Don’t guess. The transmission fluid dipstick (if your car has one) looks similar and is close by. Checking oil level with the transmission dipstick is a mistake that has consequences.
No dipstick at all? Many vehicles built after 2010 — particularly European brands like BMW, Mercedes, Audi, and Mini, plus some newer Japanese models — have eliminated the traditional dipstick in favor of an electronic oil level sensor. On these vehicles, you check oil level through the instrument cluster menu (typically under “Vehicle Status” or similar). Check your owner’s manual if you’re not sure which system your car has.
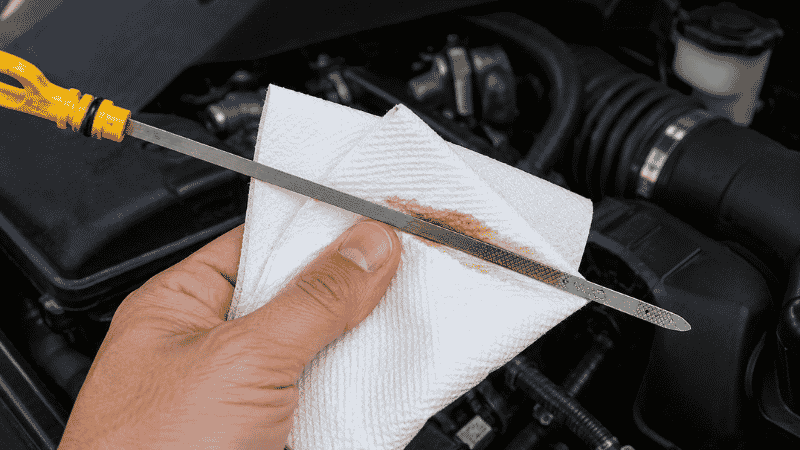
Step 2: Pull the Dipstick and Wipe It Clean
Grip the handle and pull the dipstick out of its tube in one smooth motion. Oil will be on the end of it from the last time the engine ran.
Here’s why the next step matters: the oil on the dipstick right now is not at your current oil level. As the engine ran and the oil circulated, some oil coated the inside of the dipstick tube and splashed onto the dipstick at various levels. If you read the dipstick now, you might see oil at the MAX mark even if the level is actually at MIN — because residual oil from circulation is coating the stick above the actual level.
Wipe the entire end of the dipstick clean with a paper towel or lint-free cloth. Wipe from the handle end toward the tip. Now the dipstick is clean and ready to give you an accurate reading.
Step 3: Reinsert the Dipstick Fully
Push the clean dipstick back into its tube all the way. You’ll feel it seat at the bottom. This is critical — if you don’t insert it fully, the reading will show lower than the actual level because the tip isn’t reaching the oil.
On some vehicles the dipstick tube has a slight curve. Follow the angle when reinserting. If it’s not going in smoothly, don’t force it — wiggle gently to find the angle.
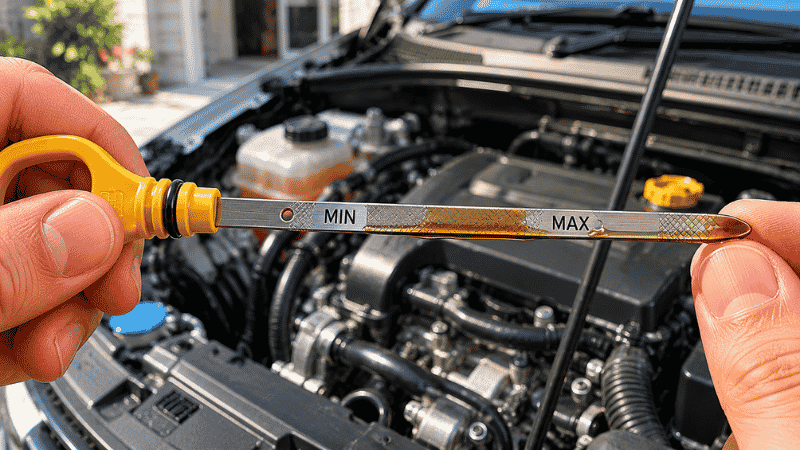
Step 4: Pull It Out and Read It
Remove the dipstick again — slowly this time — and hold it horizontally so the oil doesn’t run to one end. Look at where the oil film ends on the dipstick.
Understanding your dipstick’s markings:
Different manufacturers use different marking systems, but they all communicate the same information:
- Two dots or holes: Upper dot = MAX/FULL, lower dot = MIN/LOW. Oil should be between them, ideally near the upper dot.
- MIN and MAX lines: Same concept — oil should be in the range between them.
- H and L markings: H = High (full), L = Low. Oil in the middle range is fine.
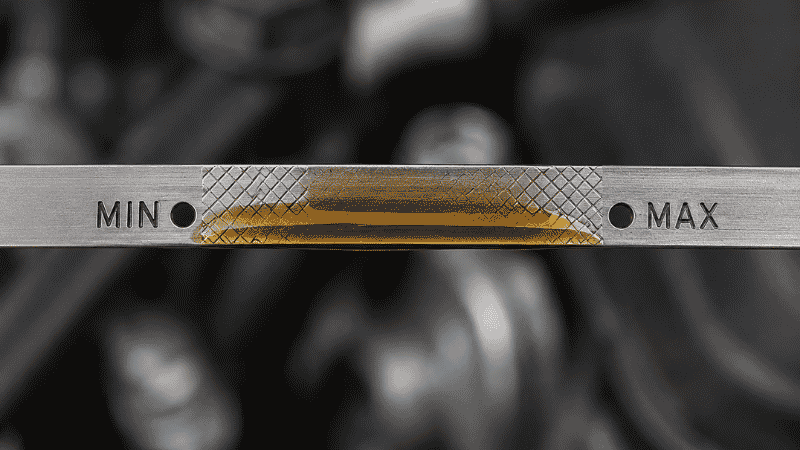
- Crosshatched or hatched area: The oil level should fall anywhere within the hatched zone. Above it means overfilled; below it means add oil.
- Single line: Some dipsticks have one line marked FULL — oil at or near this line is correct. Significantly below it means add oil.
The reading to look for: Oil level between the two marks (or within the hatched zone), ideally in the upper half of the range. Not over the MAX line (overfilling has its own consequences) and not below the MIN line.
If you can’t see any oil on the dipstick at all: The level is critically low. Add oil before starting the engine again.
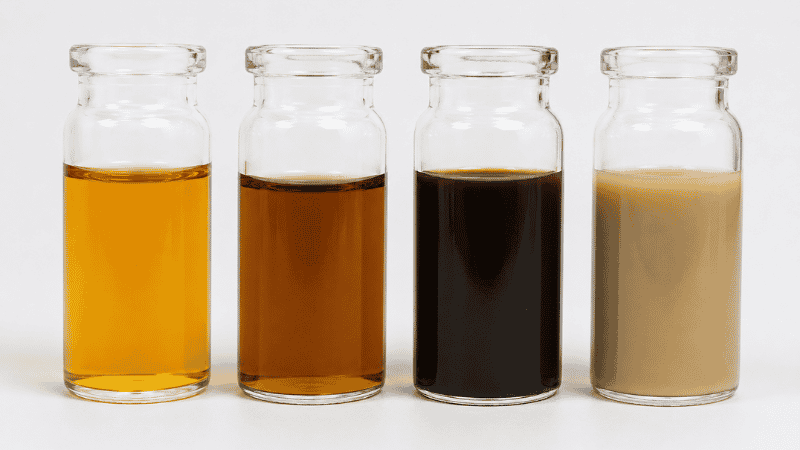
Step 5: Read the Oil Color and Condition
While you have the dipstick out, look at what the oil looks like — not just where the level is. Color and condition tell you about oil health and can signal developing problems.
What healthy oil looks like:
- Fresh oil is transparent amber or golden
- Used but still-good oil is light to medium brown, slightly translucent when held up to light
- Dark brown oil is approaching the end of its service life — still functional but schedule a change soon
Warning signs that require action:
Black and opaque: Oil is significantly overdue for a change. Change it within the next week. Black oil isn’t immediately dangerous but means the detergent additives are exhausted and contaminants are accumulating.
Milky, gray, or cream-colored: This is the one that means stop driving. Coolant has entered the oil — almost always from a failed head gasket or cracked cylinder head. The coolant-oil mixture provides essentially no lubrication and causes rapid engine damage. Do not drive the car. Have it towed to a mechanic.
Gritty or metallic particles visible: Internal engine wear is producing metal particles. This is serious engine damage in progress. Stop driving and have it diagnosed.
Smells strongly of gasoline: Fuel is leaking into the oil — a fuel injector or fuel system issue. Have it inspected.
Step 6: Add Oil If Needed
If the oil level is between the marks, you’re done. Replace the dipstick fully and close the hood.
If the level is below the MIN mark or there’s no oil visible on the dipstick:
Find the oil filler cap: This is a separate cap on top of the engine, usually marked with an oil can symbol or the word “OIL.” It’s not the same as the dipstick — it’s where you add oil in.
Use the correct oil: Check the oil filler cap or your owner’s manual for the recommended viscosity (e.g., 5W-30, 0W-20). Using the wrong viscosity isn’t immediately catastrophic but reduces protection — especially in cold weather.
Add oil in small amounts: Pour in about half a quart, wait 30 seconds for it to settle, then recheck the dipstick. Repeat until the level reaches the appropriate mark. Adding too much oil is a real problem — overfilling causes oil foaming, which reduces its lubricating ability and can damage engine seals.
Use a funnel. Pouring oil without a funnel on a hot engine bay leads to oil dripping onto hot exhaust components, which creates smoke and eventually a burning smell.
Replace the oil filler cap securely. A loose cap will spray oil throughout the engine bay and create a mess and a burning smell the next time you drive.

What Your Oil Level Is Actually Telling You
Checking oil level isn’t just a safety ritual — the results tell you something about your engine’s health over time.
Normal: Level Is Where You Expect It
Between changes, a small amount of oil consumption is normal — most manufacturers consider up to one quart per 3,000 miles to be within specification for many engines. If your level is slightly below the MAX mark when you check monthly, that’s normal.
Worth Monitoring: Level Drops Noticeably Between Checks
If you’re consistently adding a quart or more between changes — every two or three weeks — your engine is either leaking or consuming oil faster than normal. Common causes:
- External leak: Oil is escaping from a gasket, seal, or connection. You may see oil spots on the driveway or smell burning oil when the engine is warm (oil dripping on hot exhaust components). Inspect the ground where you park regularly.
- Oil consumption: The engine is burning oil during combustion — getting past the piston rings or valve seals and being burned with the fuel. You may see faint blue-gray smoke from the exhaust, especially on startup.
Neither situation is fixed by just adding oil. Find the source.

Concerning: Level Has Dropped Significantly Since Last Check
If you check oil and it’s more than a quart low since your last check two weeks ago, something specific has changed. Check the ground under the car. Check for visible oil on the engine exterior. If you can’t identify a visible leak source, have it diagnosed — sudden increased consumption often indicates a developing seal failure or other mechanical issue.
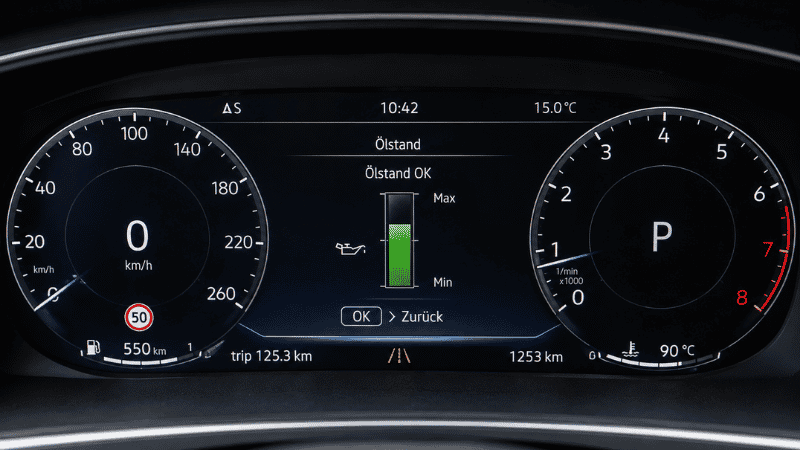
Cars Without a Dipstick: Electronic Oil Level Monitoring
Vehicles with electronic oil level monitoring (increasingly common, especially in European vehicles) don’t have a traditional dipstick. The system uses a sensor in the oil pan to measure oil level and reports it through the instrument cluster.
How to check: Engine warm and running (or per your owner’s manual), navigate to the oil level section in the vehicle information menu. It typically shows a graphic of the oil level relative to MIN and MAX.
Limitations of electronic monitoring: The sensor measures when the engine is running, which means it’s measuring warm, expanded oil — the reading reflects operating level, not cold settled level. The sensor can also fail, giving false readings. If you suspect inaccurate readings, some of these vehicles do have a manual check point accessible from underneath — check your owner’s manual or service documentation.
How Often to Check
Monthly is the standard recommendation for most drivers. Choose a consistent day — the first of each month, payday, whatever you’ll actually remember — and do it before your first drive of the day.
Before any long trip (200+ miles): Check oil, coolant, and tire pressure before a significant drive.
When the oil pressure warning light comes on: Check immediately, before driving further. A red oil pressure warning light means potential critical oil pressure issue — don’t drive to the next gas station and then check. Pull over safely and check now.
After an oil change: Check the level 24 hours after an oil change. New oil sometimes requires a short period to fully settle, and it’s worth confirming the level was set correctly.
FAQ
How often should I check my car’s oil? Monthly is the practical standard for most drivers. More frequently if the car has high mileage, is older, or you know it consumes some oil between changes. Once a month takes 2 minutes and catches problems before they become expensive.
Should I check oil when the engine is hot or cold? Cold or fully cooled is most accurate — meaning the car has been parked for at least 5–10 minutes, preferably more. A fully cold engine (sitting overnight) gives the most accurate reading because all the oil has fully settled into the pan. Checking immediately after driving gives a falsely low reading.
What does it mean when my oil is black? Black oil means it’s significantly overdue for a change. The oil’s detergent additives have been depleted and it’s carrying a high load of combustion byproducts. It’s not an emergency but schedule an oil change within the next week. Black oil that’s also gritty or has visible particles is more serious — that indicates metal particles from engine wear.
What if I can’t find my dipstick? Two possibilities: it’s in an unexpected location (check your owner’s manual for a diagram), or your vehicle doesn’t have one. Many post-2010 vehicles, especially European brands, use electronic oil level monitoring instead of a dipstick. Your owner’s manual will tell you which system you have and how to check the level.
How much oil should I add if it’s low? Add half a quart at a time, wait for it to settle, then recheck the dipstick. Repeat until the level reaches the appropriate mark. The difference between MIN and MAX on most dipsticks represents approximately one quart — don’t add a full quart without checking, because overfilling is also harmful.
Can I mix different brands of motor oil? Yes, within the same viscosity grade. Mixing 5W-30 from two different brands is fine. Mixing different viscosity grades (5W-30 with 10W-40, for example) is generally acceptable in an emergency but not ideal as a regular practice. Never mix conventional and synthetic in a car specified for synthetic.
What does milky or creamy oil mean? Coolant has entered the oil — most commonly from a blown head gasket. This is a serious mechanical failure. The milky mixture provides almost no lubrication and causes rapid engine damage. Do not drive the vehicle. Have it towed to a mechanic for diagnosis.
What’s Next
Checking oil is one part of keeping your engine healthy. These guides cover the connected maintenance tasks:
- How to do an oil change — when to change it yourself vs. going to a shop, and the real cost breakdown. (→ How to Do an Oil Change)
- How to check car fluids — oil is one of six fluids your car needs; this guide covers all of them in one 10-minute monthly routine. (→ How to Check Car Fluids)
- Car maintenance checklist — where monthly oil checks fit in a complete annual maintenance schedule. (→ Car Maintenance Checklist)
- How to check car battery — the other monthly check that prevents most common breakdowns. (→ How to Check Your Car Battery)
An engine that’s properly lubricated runs cooler, lasts longer, and gives you far more warning before anything goes wrong. Two minutes a month is a reasonable trade for that.
References
- American Petroleum Institute (API) — Engine Oil Licensing and Certification System, oil viscosity standards and recommended oil change intervals by vehicle type
- Society of Automotive Engineers (SAE) International — SAE J300: Engine Oil Viscosity Classification, viscosity grade standards and performance requirements
- U.S. Department of Energy — Vehicle Maintenance and Fuel Economy, fueleconomy.gov guidance on oil change impact on fuel efficiency
- Consumer Reports — How to Check Engine Oil, technical guidance on dipstick reading methodology and oil condition assessment
This article contains affiliate links. AutoIXPro may earn a small commission on purchases through our links at no extra cost to you. All recommendations are based on genuine research and practical value. See our Affiliate Disclosure for details.
Oil check question we didn’t cover? Contact us — we read every message.