Last updated: May 2026 | Reading time: 11 min | Category: Safety & Emergency
Key Takeaways
- The correct tire pressure for your car is on the sticker inside your driver’s door — not on the tire sidewall, which shows the maximum allowed pressure, not the recommended pressure
- Tire pressure drops approximately 1 PSI for every 10°F drop in temperature — which means a tire that’s properly inflated in October can be dangerously low by January
- Always check pressure when tires are “cold” — meaning the car has been parked for at least 3 hours, or driven less than a mile. Hot tires read 4–6 PSI higher than actual
- A digital tire pressure gauge costs $10–15 and is one of the most practical tools a driver can own — far more accurate than the stick gauges at gas stations
- Your TPMS warning light means at least one tire is 25% below recommended pressure — that’s significantly underinflated, not just slightly low
The Warning Light That Most People Ignore
You’re driving to work, glance at the dashboard, and there it is — that orange horseshoe shape with an exclamation point. The TPMS light. You think: it’s probably fine. It was raining last night, maybe it’s just the cold. You’ll check it this weekend.
This is how most tire pressure problems turn into tire failures.
The TPMS warning light doesn’t come on when tires are slightly low. By federal regulation, it triggers when at least one tire is 25% below the vehicle manufacturer’s recommended pressure. On a tire that should be at 32 PSI, that means it’s at 24 PSI or below. At that pressure, the tire is flexing far more than it was designed to, generating heat, wearing unevenly, and becoming significantly more susceptible to sudden failure.
Learning how to check tire pressure yourself takes about five minutes the first time and about two minutes every time after that. It requires one inexpensive tool and no mechanical knowledge. And it’s one of the most direct things you can do to extend the life of your tires, improve your fuel economy, and reduce your risk of a roadside emergency.
This guide covers everything from finding your recommended pressure to reading a gauge correctly — plus the specific situations where most drivers get it wrong.
Step 1: Find Your Vehicle’s Recommended Tire Pressure
Before you touch a gauge, you need to know the target number. This is the step most people skip, which is why they end up with tires inflated to whatever random number they remember from last time.
Where to find it:
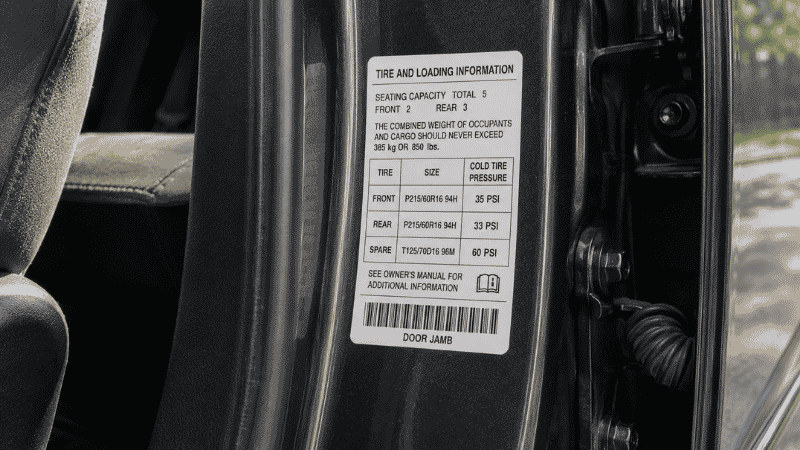
Your vehicle’s recommended tire pressure is printed on a sticker inside the driver’s door jamb — open the driver’s door and look at the edge of the door frame or the B-pillar. It’s usually a white or yellow label that lists front and rear tire pressures separately, along with tire size.
It’s also in your owner’s manual, typically in the maintenance or specifications section.
What NOT to use:
The number molded into the tire sidewall — something like “Max. Press. 51 PSI” — is the maximum pressure the tire can hold, not the pressure your car needs. Inflating to this number would make the ride stiff and handling unpredictable, and would actually reduce the tire’s contact patch with the road, decreasing traction. The vehicle manufacturer’s recommendation accounts for load, suspension geometry, and handling — always use that number.
Typical recommended pressures by vehicle type:
- Compact and mid-size sedans: 30–35 PSI
- SUVs and crossovers: 33–40 PSI
- Trucks: 35–45 PSI (varies significantly by load)
- Performance vehicles: often higher, specified per axle
- Electric vehicles: frequently higher than equivalent ICE vehicles due to battery weight
Front and rear pressures are sometimes different — especially on rear-wheel drive and performance vehicles. Check both.
Step 2: Check Pressure When Tires Are Cold
This is the most commonly misunderstood aspect of tire pressure, and it’s the reason your readings can be off by 4–6 PSI depending on when you check.
Driving heats up the air inside tires. A tire that has been driven on for 30 minutes at highway speed can read 5–6 PSI higher than its true “cold” pressure — not because it’s overinflated, but because warm air expands. If you inflate to your target pressure when the tires are warm, you’ve actually underinflated them. When they cool back down, they’ll read lower than intended.
The rule: Check tire pressure when the car has been parked for at least 3 hours, or when you’ve driven less than 1 mile at low speed. First thing in the morning before you leave for work is ideal.
If you’ve already been driving and need to check, add 4 PSI to your target number as a rough compensation — but this is an approximation. For accurate readings, wait for cold tires.
Step 3: Choose the Right Pressure Gauge
You need a tire pressure gauge. The options matter more than most guides acknowledge.
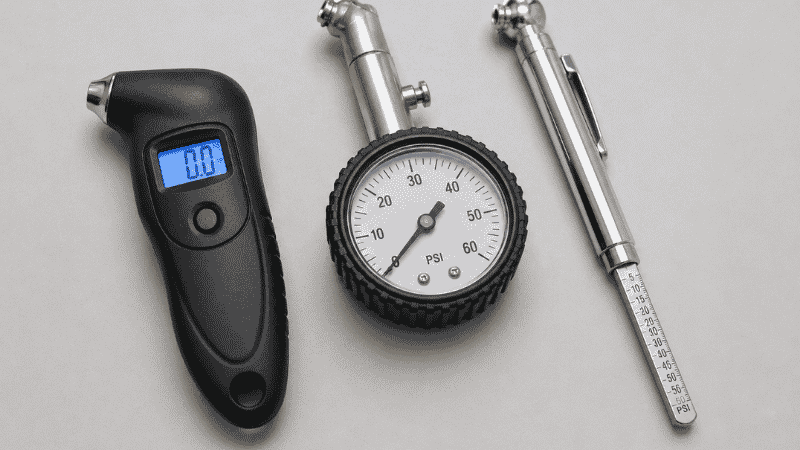
Digital Gauge ($10–$20)
The best option for most drivers. Clear LCD readout, accurate to ±0.5 PSI, easy to read in any lighting, and fits in a glove box. The Accutire MS-4021B and ThirtyA digital gauges are both reliable, widely reviewed options under $15.
Dial (Analog) Gauge ($10–$25)
A mechanical gauge with a round dial. Accurate and durable — no batteries required. Slightly slower to read but preferred by many mechanics for its reliability. The Milton S-921 is a well-regarded option.
Stick (Pencil) Gauge ($3–$8)
The inexpensive type found at gas stations — a metal stick that pops out to indicate pressure. These work, but they’re the least accurate type and can be difficult to read clearly. The friction fit can also cause them to read differently depending on how firmly you press them against the valve. Acceptable in a pinch; not the tool to rely on for precise monthly checks.
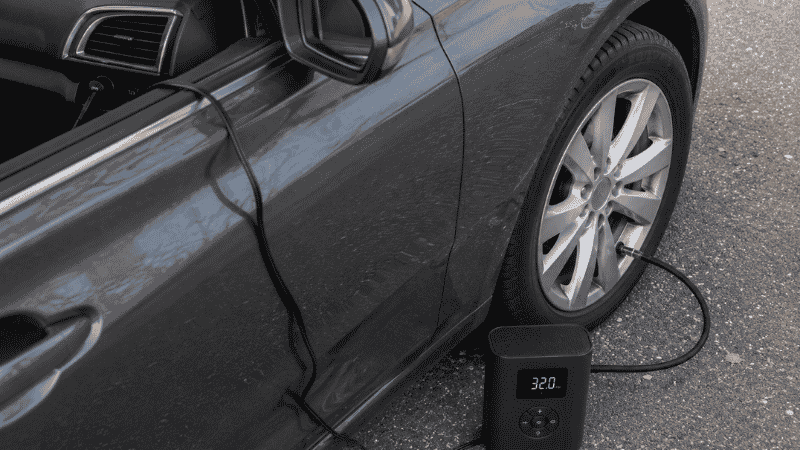
Built into portable inflators ($25–$60)
Many portable tire inflators include an integrated pressure gauge. Convenient for checking and inflating without separate tools, though the accuracy varies by brand. If you own a portable inflator, check whether its gauge has been verified against a standalone gauge — some inflator gauges read 2–3 PSI off.
Recommendation: Own one dedicated digital gauge and keep it in your car. At $10–15, it’s a one-time purchase that pays for itself the first time it helps you catch a low tire before it causes a problem.
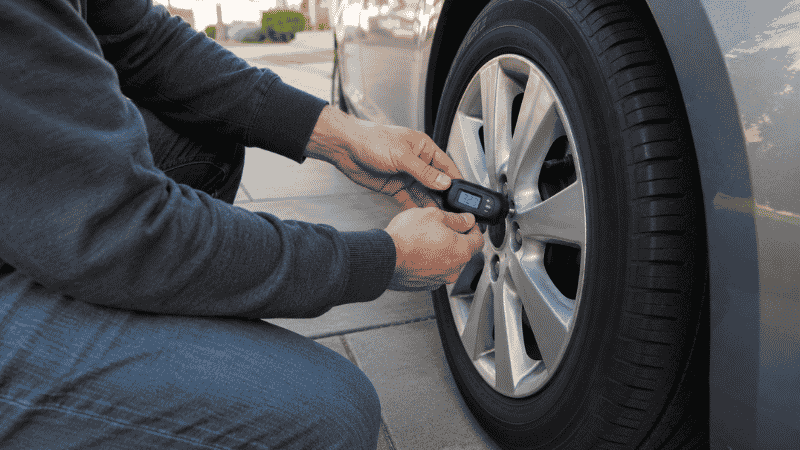
Step 4: Check Each Tire — The Right Way
With your gauge in hand and your target pressure known:
1. Locate the valve stem on each tire — it’s the small rubber or metal protrusion sticking out from the wheel rim. Remove the valve cap and set it somewhere you won’t lose it. A dropped valve cap is a minor nuisance; a lost one lets in dirt that can cause slow leaks over time.
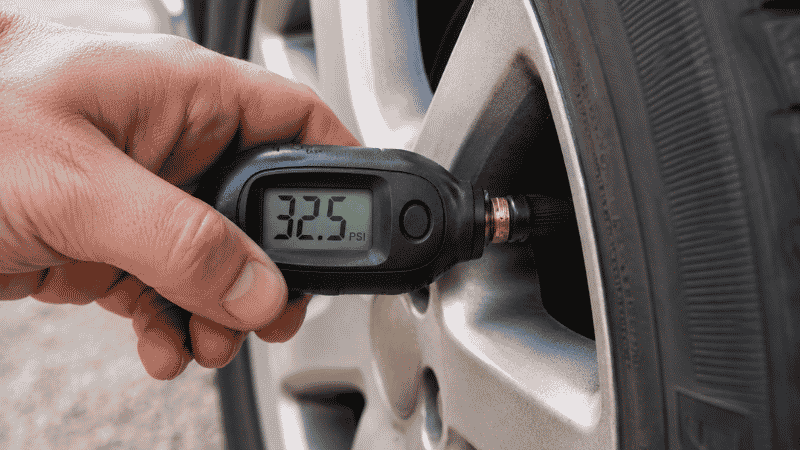
2. Press the gauge firmly onto the valve stem. You want a solid, centered contact. It’s normal to hear a brief hiss of air — that’s air escaping around the gauge seal before it seats properly. A consistent hiss that doesn’t stop means the gauge isn’t fully seated; reposition and try again.
3. Read the pressure on the gauge. Compare it to your target.
4. Note the result for all four tires before inflating or releasing any air. This gives you a complete picture — sometimes one tire is significantly different from the others, which can indicate a slow leak worth investigating.
5. Replace the valve cap on each tire after checking.
Check all four tires every time — don’t skip the rear tires because they’re harder to access. Rear tires on FWD vehicles are the most commonly neglected and often show the most uneven wear as a result.
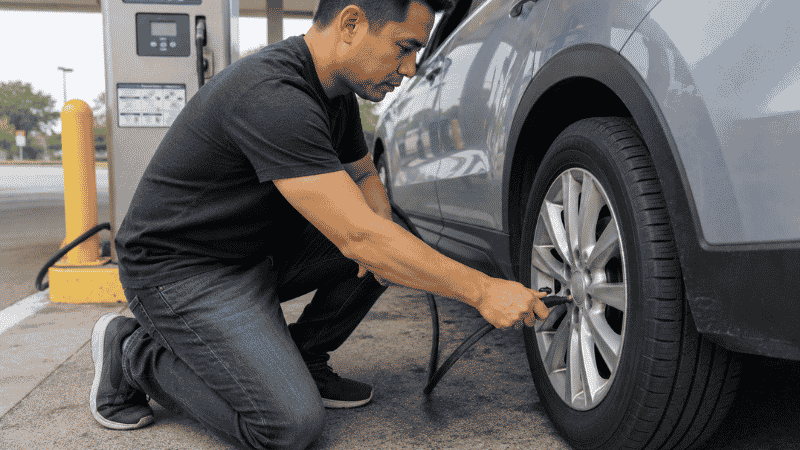
Step 5: Add Air If Needed
If any tire is below the recommended pressure:
At a gas station air compressor: Most gas station air machines are free or cost $1–2. They include a built-in gauge — but use your own gauge to verify, as station gauges are frequently inaccurate from being dropped and mishandled.
- Park close enough for the hose to reach all four tires
- Remove valve caps before starting
- Press the hose fitting firmly onto the valve stem — you should hear air flowing in
- Add air in short bursts and check pressure between each burst, especially when close to target
- Easy to overshoot; better to underfill slightly and add again than to overfill and have to release
With a portable inflator: A compact 12V tire inflator plugs into your car’s power outlet and inflates a standard passenger tire in 2–4 minutes. Set your target PSI, attach to the valve stem, and it stops automatically at the target. For drivers who check tires monthly or live in climates with large temperature swings, a portable inflator is worth the $30–50 investment.
Step 6: Release Air If Overinflated
Overinflated tires are less commonly discussed but cause real problems. High pressure reduces the tire’s contact patch with the road, which decreases grip — counterintuitively, more pressure doesn’t mean more traction. Overinflated tires also wear faster in the center of the tread and are more vulnerable to impact damage from potholes.
To release air:
- Use the small pin or bead on the back of your tire pressure gauge, or a dedicated valve core tool
- Press it into the center of the valve stem — air escapes immediately
- Release in short bursts and check pressure between each release
- When approaching target pressure, release in very small amounts — it’s easy to overshoot in the release direction too
The Temperature Factor: Why Winter Kills Tire Pressure

This is the section most tire pressure guides either skip or mention without giving actionable numbers. Here’s the physics that matters:
Every 10°F drop in ambient temperature causes approximately 1 PSI drop in tire pressure.
This relationship is consistent across tire types and sizes. It means:
- A tire properly inflated at 35 PSI in October (60°F) will read approximately 31 PSI in January (20°F) — without any air escaping
- A tire borderline at 33 PSI in fall will be at 29 PSI in winter — below most manufacturers’ minimum operating recommendation
- The NHTSA has identified temperature-related underinflation as a significant contributor to winter tire failures
Practical implication: When temperatures drop significantly — more than 20°F from when you last checked — check your tire pressure and expect to add 1–2 PSI per tire. This is a normal seasonal maintenance task, not a sign that something is wrong with your tires.
The reverse is also true: tires inflated in cold weather will read higher in summer heat. A tire at 35 PSI in January in Minnesota may read 40 PSI in July. Check in both directions.
Understanding Your TPMS Warning Light
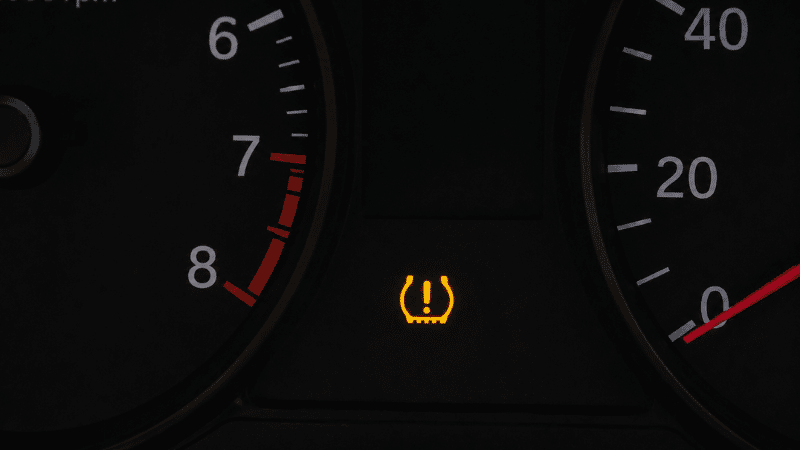
Most vehicles made after 2007 are required by law to have a Tire Pressure Monitoring System (TPMS). Understanding what the light actually means prevents the common mistake of treating it as an all-clear when it goes off.
What the light means when it comes on: At least one tire is 25% or more below the manufacturer’s recommended pressure. This is not a minor drop — at most recommended pressures, 25% below is 7–10 PSI underinflated. The tire is noticeably soft and driving on it for extended periods risks heat buildup, sidewall damage, and blowout.
What the light does not mean:
- That your tires are at exactly the TPMS threshold — they may be much lower
- That all tires are equally low — often only one tire is triggering the alert
- That checking once is sufficient — the other tires may be close to the threshold even if not triggering yet
After you’ve inflated the tires: On most vehicles, the TPMS light turns off automatically once you drive above 25 mph for a few minutes after reaching proper pressure. If it stays on after inflating all four tires to correct pressure, one of three things is happening: the sensor needs recalibration (usually done through a menu in your car’s settings or by a technician), a sensor battery is dead, or there’s still a pressure issue in one tire.
The TPMS does not replace manual checks. It only warns you about severe underinflation. A tire that’s 5 PSI low — affecting fuel economy, handling, and wear — won’t trigger the TPMS. Monthly manual checks catch what the TPMS misses.
How Often Should You Check Tire Pressure?
Monthly: The standard recommendation from the U.S. Tire Manufacturers Association and most vehicle manufacturers. Pick a consistent day — the first of each month, or every time you pay a monthly bill — so it becomes automatic.
Before long trips: Check all four tires and the spare before any road trip over 2–3 hours. Tire failures are more common at highway speeds and in heat, both of which characterize long drives.
After significant temperature changes: Any swing of 20°F or more is a reason to check. This is especially relevant in fall and spring when temperatures fluctuate dramatically.
After hitting a significant pothole or curb: Impact can cause slow leaks or internal damage that doesn’t immediately flatten the tire but causes gradual pressure loss.
When one tire looks different from the others: Trust your eyes. A tire that looks slightly lower than its neighbors almost certainly is — check it before driving further.
What to Do When One Tire Keeps Losing Pressure
If you check your tires regularly and one consistently reads 3–5 PSI lower than the others each month, it has a slow leak. Common causes:
Nail or screw in the tread: The most common cause. The object often seals itself temporarily, allowing the tire to hold most of its pressure while slowly leaking. A tire shop can inspect and patch for $15–30 in most cases — often repairable if the puncture is in the tread and not the sidewall.
Leaking valve stem: The rubber valve stem degrades over time and can develop slow leaks. A valve core replacement or new stem costs $5–10 at any tire shop.
Rim leak: On alloy wheels especially, corrosion between the wheel and tire bead can allow air to escape slowly. A shop can clean and reseal the bead.
Damaged tire bead: If the tire was mounted improperly or damaged, the bead may not seal perfectly against the wheel. Usually requires dismounting and remounting.
A tire that loses more than 2 PSI per month without identifiable cause should be inspected professionally. Driving on a consistently underinflated tire accelerates wear significantly — what might last 50,000 miles properly inflated can wear out in 30,000 miles if consistently 5–8 PSI low.
FAQ
What should my tire pressure be? Check the sticker inside your driver’s door jamb — it lists the manufacturer’s recommended PSI for front and rear tires specifically for your vehicle. Typical ranges are 30–35 PSI for sedans, 33–40 PSI for SUVs, and 35–45 PSI for trucks. Never use the number on the tire sidewall as your target — that’s the maximum pressure, not the recommended pressure.
Can I check tire pressure at a gas station? Yes, and most gas stations have air compressors available. However, the built-in gauges on gas station air machines are often inaccurate — they get dropped, damaged, and never calibrated. Use your own digital gauge to verify pressure rather than relying on the station’s gauge.
Why does my tire pressure keep going down? Natural air permeation causes tires to lose approximately 1–2 PSI per month under normal conditions — this is expected. If a tire is losing 3–5 PSI or more per month, it has a slow leak that needs to be identified and repaired. Check for nails, inspect the valve stem, and have a shop check the bead seal.
Should I inflate my tires to the max PSI? No. The max PSI on the tire sidewall is the maximum the tire structure can safely contain — not a recommended operating pressure. Inflating to max PSI reduces traction, makes the ride harsh, and causes accelerated center tread wear. Always use the vehicle manufacturer’s recommendation from your door jamb sticker.
How do I check tire pressure without a gauge? You can’t — not accurately. The “kick the tire” and “squeeze the sidewall” methods are unreliable and can’t detect 5–10 PSI differences that meaningfully affect performance and safety. A basic tire gauge costs $3–8 and is the only reliable way to know your actual pressure.
Does tire pressure affect gas mileage? Yes, measurably. The U.S. Department of Energy estimates that for every 1 PSI drop below recommended pressure across all four tires, fuel economy decreases by approximately 0.2%. A car running 8 PSI low on all four tires is losing roughly 1.6% in fuel economy — not enormous, but real. Properly inflated tires also roll with less resistance, which improves efficiency especially at highway speeds.
What’s the difference between TPMS and checking manually? TPMS only alerts you when a tire is 25% or more below recommended pressure — a significant underinflation event. It misses gradual pressure loss in the 5–10 PSI range that affects economy, handling, and tire wear without triggering a warning. Manual monthly checks catch what TPMS doesn’t.
What’s Next
Tire pressure is the easiest and most impactful tire maintenance habit. Once you’ve got that covered, these guides complete the picture:
- How often to rotate tires — pressure checks and rotation work together to maximize tire life and safety. (→ How Often to Rotate Tires)
- How to change a flat tire — knowing what to do when a tire fails despite good maintenance. (→ How to Change a Flat Tire)
- Car essentials every driver should have — including the tire pressure gauge and portable inflator that make this a two-minute monthly habit. (→ Car Essentials Every Driver Actually Needs)
A tire you can see and touch and measure is a tire you understand. That’s the difference between reacting to a blowout and preventing one.
References
- National Highway Traffic Safety Administration (NHTSA) — Tire Safety: Everything Rides on It, Federal consumer safety publication; TPMS threshold requirements under FMVSS No. 138
- U.S. Department of Energy — Keeping Tires Properly Inflated, fueleconomy.gov consumer guidance
- U.S. Tire Manufacturers Association (USTMA) — Tire Care & Safety Guide, recommended inspection and inflation intervals
- Society of Automotive Engineers (SAE) — Temperature Effects on Tire Inflation Pressure, SAE Technical Paper Series
Have a tire pressure question we didn’t cover? Contact us — we read every message.